HP 2700n HP Color LaserJet 2700 - Software Technical Reference - Page 123
Thank you for buying another HP product, Installing, Connection Type, Cancel
 |
View all HP 2700n manuals
Add to My Manuals
Save this manual to your list of manuals |
Page 123 highlights
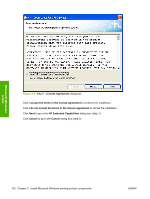
Microsoft Windows install Figure 3-9 Step 9 - Ready to Install dialog box Click Back to go back to the Thank you for buying another HP product! (destination folder) dialog box (step 8). Click Next to go to the Installing screen, which will automatically lead to the Connection Type dialog box (step 10). Click Cancel to go to the Cancel dialog box (step 2). ENWW Installation dialog box options for Microsoft Windows 2000, Microsoft Windows XP, and Microsoft 105 Windows 2003
-
 1
1 -
2
-
3
-
4
-
5
-
6
-
7
-
8
-
9
-
10
-
11
-
12
-
13
-
14
-
15
-
16
-
17
-
18
-
19
-
20
-
21
-
22
-
23
-
24
-
25
-
26
-
27
-
28
-
29
-
30
-
31
-
32
-
33
-
34
-
35
-
36
-
37
-
38
-
39
-
40
-
41
-
42
-
43
-
44
-
45
-
46
-
47
-
48
-
49
-
50
-
51
-
52
-
53
-
54
-
55
-
56
-
57
-
58
-
59
-
60
-
61
-
62
-
63
-
64
-
65
-
66
-
67
-
68
-
69
-
70
-
71
-
72
-
73
-
74
-
75
-
76
-
77
-
78
-
79
-
80
-
81
-
82
-
83
-
84
-
85
-
86
-
87
-
88
-
89
-
90
-
91
-
92
-
93
-
94
-
95
-
96
-
97
-
98
-
99
-
100
-
101
-
102
-
103
-
104
-
105
-
106
-
107
-
108
-
109
-
110
-
111
-
112
-
113
-
114
-
115
-
116
-
117
-
 118
118 -
 119
119 -
 120
120 -
 121
121 -
 122
122 -
 123
123 -
 124
124 -
 125
125 -
 126
126 -
 127
127 -
 128
128 -
129
-
130
-
131
-
132
-
133
-
134
-
135
-
136
-
137
-
138
-
139
-
140
-
141
-
142
-
143
-
144
-
145
-
146
-
147
-
148
-
149
-
150
-
151
-
152
-
153
-
154
-
155
-
156
-
157
-
158
-
159
-
160
-
161
-
162
-
163
-
164
-
165
-
166
-
167
-
168
-
169
-
170
-
171
-
172
-
173
-
174
-
175
-
176
-
177
-
178
-
179
-
180
-
181
-
182
-
183
-
184
-
185
-
186
-
187
-
188
-
189
-
190
-
191
-
192
-
193
-
194
-
195
-
196
-
197
-
198
-
199
-
200
-
201
-
202
-
203
-
204
-
205
-
206
-
207
-
208
-
209
-
210
-
211
-
212
-
213
-
214
-
215
-
216
-
217
-
218
-
219
-
220
-
221
-
222
-
223
-
224
-
225
-
226
-
227
-
228
-
229
-
230
-
231
-
232
-
233
-
234
-
235
-
236
-
237
-
238
-
239
-
240
-
241
-
242
-
243
-
244
-
245
-
246
-
247
-
248
-
249
-
250
-
251
-
252
-
253
-
254
-
255
-
256
-
257
-
258
-
259
-
260
-
261
-
262
-
263
-
264
-
265
-
266
-
267
-
268
-
269
-
270
-
271
-
272
 |
 |

Figure 3-9
Step 9 - Ready to Install dialog box
Click
Back
to go back to the
Thank you for buying another HP product!
(destination folder) dialog
box (step 8).
Click
Next
to go to the
Installing
screen, which will automatically lead to the
Connection Type
dialog
box (step 10).
Click
Cancel
to go to the
Cancel
dialog box (step 2).
ENWW
Installation dialog box options for Microsoft Windows 2000, Microsoft Windows XP, and Microsoft
Windows 2003
105
Microsoft Windows
install