HP Q7815A HP LaserJet P3005 - User Guide - Page 141
Clear jams, Clear jams from the input-tray areas, SHOW ME HOW
 |
View all HP Q7815A manuals
Add to My Manuals
Save this manual to your list of manuals |
Page 141 highlights
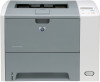
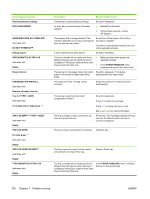
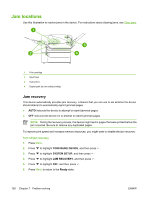
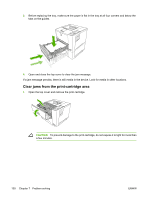
Clear jams When clearing jams, be very careful not to tear the media. If a small piece of media remains in the device, it could cause additional jams. The SHOW ME HOW control-panel menu includes a page that shows how to clear jams. See Show Me How menu. Clear jams from the input-tray areas NOTE To remove media from the tray 1 area, slowly pull the media out of the device. For all other trays, complete the following procedure. 1. Slide the tray out of the device, and remove any damaged paper from the tray. 2. If the edge of the paper is visible in the feed area, slowly pull the paper down and out of the device. If the paper is not visible, look in the top cover area. NOTE Do not force the paper if it will not move easily. If the paper is stuck in a tray, try removing it through the tray above (if applicable) or through the top-cover area. ENWW Clear jams 129
-
 1
1 -
2
-
3
-
4
-
5
-
6
-
7
-
8
-
9
-
10
-
11
-
12
-
13
-
14
-
15
-
16
-
17
-
18
-
19
-
20
-
21
-
22
-
23
-
24
-
25
-
26
-
27
-
28
-
29
-
30
-
31
-
32
-
33
-
34
-
35
-
36
-
37
-
38
-
39
-
40
-
41
-
42
-
43
-
44
-
45
-
46
-
47
-
48
-
49
-
50
-
51
-
52
-
53
-
54
-
55
-
56
-
57
-
58
-
59
-
60
-
61
-
62
-
63
-
64
-
65
-
66
-
67
-
68
-
69
-
70
-
71
-
72
-
73
-
74
-
75
-
76
-
77
-
78
-
79
-
80
-
81
-
82
-
83
-
84
-
85
-
86
-
87
-
88
-
89
-
90
-
91
-
92
-
93
-
94
-
95
-
96
-
97
-
98
-
99
-
100
-
101
-
102
-
103
-
104
-
105
-
106
-
107
-
108
-
109
-
110
-
111
-
112
-
113
-
114
-
115
-
116
-
117
-
118
-
119
-
120
-
121
-
122
-
123
-
124
-
125
-
126
-
127
-
128
-
129
-
130
-
131
-
132
-
133
-
134
-
135
-
 136
136 -
 137
137 -
 138
138 -
 139
139 -
 140
140 -
 141
141 -
 142
142 -
 143
143 -
 144
144 -
 145
145 -
 146
146 -
147
-
148
-
149
-
150
-
151
-
152
-
153
-
154
-
155
-
156
-
157
-
158
-
159
-
160
-
161
-
162
-
163
-
164
-
165
-
166
-
167
-
168
-
169
-
170
-
171
-
172
-
173
-
174
-
175
-
176
-
177
-
178
-
179
-
180
-
181
-
182
-
183
-
184
-
185
-
186
-
187
-
188
-
189
-
190
-
191
-
192
-
193
-
194
-
195
-
196
-
197
-
198
-
199
-
200
-
201
-
202
-
203
-
204
-
205
-
206
-
207
-
208
-
209
-
210
-
211
-
212
-
213
-
214
-
215
-
216
-
217
-
218
 |
 |