HP Q7815A HP LaserJet P3005 - User Guide - Page 56
Network configuration, Manually con TCP/IP parameters from the control panel - laserjet p3005dn ()
 |
View all HP Q7815A manuals
Add to My Manuals
Save this manual to your list of manuals |
Page 56 highlights
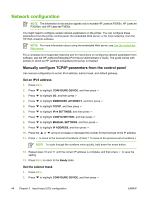
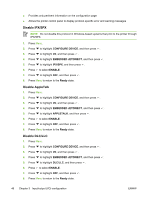
Network configuration NOTE The information in this section applies only to models HP LaserJet P3005n, HP LaserJet P3005dn, and HP LaserJet P3005x. You might need to configure certain network parameters on the printer. You can configure these parameters from the printer control panel, the embedded Web server, or for most networks, from the HP Web Jetadmin software. NOTE For more information about using the embedded Web server, see Use the embedded Web server. For a complete list of supported networks and for instructions on configuring network parameters from software, see the HP Jetdirect Embedded Print Server Administrator's Guide. The guide comes with printers in which an HP Jetdirect embedded print server is installed. Manually configure TCP/IP parameters from the control panel Use manual configuration to set an IPv4 address, subnet mask, and default gateway. Set an IPv4 address 1. Press Menu. 2. Press to highlight CONFIGURE DEVICE, and then press . 3. Press to highlight I/O, and then press . 4. Press to highlight EMBEDDED JETDIRECT, and then press . 5. Press to highlight TCP/IP, and then press . 6. Press to highlight IPv4 SETTINGS, and then press . 7. Press to highlight CONFIG METHOD, and then press . 8. Press to highlight MANUAL SETTINGS, and then press . 9. Press to highlight IP ADDRESS, and then press . 10. Press the or arrow to increase or decrease the number for the first byte of the IP address. 11. Press to move to the next set of numbers. (Press to move to the previous set of numbers.) NOTE To cycle through the numbers more quickly, hold down the arrow button. 12. Repeat steps 10 and 11 until the correct IP address is complete, and then press setting. 13. Press Menu to return to the Ready state. to save the Set the subnet mask 1. Press Menu. 2. Press to highlight CONFIGURE DEVICE, and then press . 44 Chapter 3 Input/output (I/O) configuration ENWW
-
 1
1 -
2
-
3
-
4
-
5
-
6
-
7
-
8
-
9
-
10
-
11
-
12
-
13
-
14
-
15
-
16
-
17
-
18
-
19
-
20
-
21
-
22
-
23
-
24
-
25
-
26
-
27
-
28
-
29
-
30
-
31
-
32
-
33
-
34
-
35
-
36
-
37
-
38
-
39
-
40
-
41
-
42
-
43
-
44
-
45
-
46
-
47
-
48
-
49
-
50
-
 51
51 -
 52
52 -
 53
53 -
 54
54 -
 55
55 -
 56
56 -
 57
57 -
 58
58 -
 59
59 -
 60
60 -
 61
61 -
62
-
63
-
64
-
65
-
66
-
67
-
68
-
69
-
70
-
71
-
72
-
73
-
74
-
75
-
76
-
77
-
78
-
79
-
80
-
81
-
82
-
83
-
84
-
85
-
86
-
87
-
88
-
89
-
90
-
91
-
92
-
93
-
94
-
95
-
96
-
97
-
98
-
99
-
100
-
101
-
102
-
103
-
104
-
105
-
106
-
107
-
108
-
109
-
110
-
111
-
112
-
113
-
114
-
115
-
116
-
117
-
118
-
119
-
120
-
121
-
122
-
123
-
124
-
125
-
126
-
127
-
128
-
129
-
130
-
131
-
132
-
133
-
134
-
135
-
136
-
137
-
138
-
139
-
140
-
141
-
142
-
143
-
144
-
145
-
146
-
147
-
148
-
149
-
150
-
151
-
152
-
153
-
154
-
155
-
156
-
157
-
158
-
159
-
160
-
161
-
162
-
163
-
164
-
165
-
166
-
167
-
168
-
169
-
170
-
171
-
172
-
173
-
174
-
175
-
176
-
177
-
178
-
179
-
180
-
181
-
182
-
183
-
184
-
185
-
186
-
187
-
188
-
189
-
190
-
191
-
192
-
193
-
194
-
195
-
196
-
197
-
198
-
199
-
200
-
201
-
202
-
203
-
204
-
205
-
206
-
207
-
208
-
209
-
210
-
211
-
212
-
213
-
214
-
215
-
216
-
217
-
218
 |
 |