Kyocera TASKalfa 4500i KM-NET Viewer Operation Guide Rev-5.2-2011-3 - Page 59
Automatic Counter Reset, Creating a Counter Report, Viewing and Changing Counter Report Settings
 |
View all Kyocera TASKalfa 4500i manuals
Add to My Manuals
Save this manual to your list of manuals |
Page 59 highlights
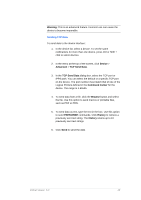
The counter report has a user-specified name, and can be sent to the e-mail addresses specified in a list. The report can be sent daily, weekly, or monthly. The time of day, day of the week, or day of the month to send the report can be specified. The e-mail can contain a user-specified message in the subject line. The attached file can be in CSV or XML format. Automatic Counter Reset This function resets the counters on a printing system to zero when a counter report is successfully sent. If the counter report is not successfully sent, the reset is not performed. Creating a Counter Report To create a counter report for a selected Account view, follow these steps: 1. In the My Views panel, highlight an Account view for which to create a counter report and select Account > Add Counter Report. Alternatively, right-click the view icon and select Add Counter Report. The Add Counter Report dialog box appears, already populated with the default settings. 2. Change the default settings as needed. 3. Click OK. Viewing and Changing Counter Report Settings You can view and change counter report settings as needed. 1. In the My Views pane, select an Account view. 2. In the main menu, click Account > Counter Reports. 3. In the Counter Reports dialog box, select a report and click Properties. 4. In the Counter Report Properties dialog box, change any settings as needed. To change the content or layout of the report, change the content and layout of the view itself. 5. Click OK. KMnet Viewer 5.2 50
-
 1
1 -
2
-
3
-
4
-
5
-
6
-
7
-
8
-
9
-
10
-
11
-
12
-
13
-
14
-
15
-
16
-
17
-
18
-
19
-
20
-
21
-
22
-
23
-
24
-
25
-
26
-
27
-
28
-
29
-
30
-
31
-
32
-
33
-
34
-
35
-
36
-
37
-
38
-
39
-
40
-
41
-
42
-
43
-
44
-
45
-
46
-
47
-
48
-
49
-
50
-
51
-
52
-
53
-
 54
54 -
 55
55 -
 56
56 -
 57
57 -
 58
58 -
 59
59 -
 60
60 -
 61
61 -
 62
62 -
 63
63 -
 64
64 -
65
-
66
-
67
-
68
-
69
-
70
-
71
-
72
-
73
-
74
-
75
-
76
-
77
-
78
-
79
-
80
-
81
-
82
-
83
-
84
-
85
-
86
-
87
-
88
-
89
-
90
-
91
-
92
-
93
-
94
 |
 |