Lexmark X925 Lexmark Document Distributor - Page 100
Customizing the home screen for a device group, Home Screen
 |
View all Lexmark X925 manuals
Add to My Manuals
Save this manual to your list of manuals |
Page 100 highlights
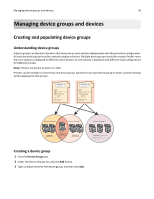
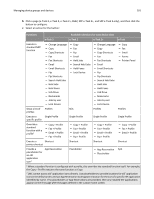
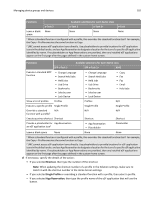
Managing device groups and devices 100 5 Select the solution from the list, and then click Next. 6 Configure the deployment settings of the solution for the current device group, and then click Finish. Note: A policy update is required to complete the deployment of the solution. For more information see "Updating policies for device groups" on page 104. Customizing the home screen for a device group To place buttons for deployed solutions on the home screens of printers in a device group (or in the menus of single‑function printers without touch screens), you can configure custom home screens. A custom home screen is not a requirement to deploy a solution. However, if the default home screen is used, then solutions must be accessed through the Held Jobs menu on the printer. Because different device classes have different capabilities, a separate custom home screen must be configured for each device class. Notes: • On e‑Task 2+ and e‑Task 3 printers, actions included in a custom home screen must be enabled in the printer settings to appear on the home screen. To adjust these settings, type the printer IP address in the address field of your Web browser to access the printer Embedded Web Server, and then click Settings > General Settings > Home screen customization. • If a printer is assigned to more than one device group with a custom home screen configured, then the last policy update determines which home screen is used. If multiple device group membership is necessary, it is not recommended to configure a home screen for more than one of the device groups to which the printer belongs. 1 Click the Device Groups tab. 2 Select a device group from the Device Groups list. 3 Select Home Screen from the Tasks list. 4 Click the tab for the class of printers that you want to configure. 5 Select the Use this home screen as part of the device group's policy check box. 6 Configure a button on the home screen: • For multifunction and single‑function printers with a touch screen (e‑Task 3, e‑Task, e‑Task 2, e‑Task 2+, X642, SFP e‑Task 2+, and SFP e‑Task 3): a Select the number of buttons to include from the Layout menu: - e‑Task 3-This may contain up to ten buttons on the first page. The remaining three pages are automatically enabled and are restricted to ten‑button layouts regardless of the layout chosen for the first page. - SFP e‑Task 3-This may contain up to four buttons on the first page. The remaining three pages are automatically enabled and are restricted to four‑button layouts regardless of the layout chosen for the first page. - e‑Task-This provides one page that may contain up to nine buttons. - e‑Task 2, e‑Task 2+, or SFP e‑Task 2+-This may contain up to nine buttons on the first page. The remaining three pages are automatically enabled and are restricted to nine‑button layouts regardless of the layout chosen for the first page. - X642-This may contain up to four buttons on the first page and only enables all four pages if 4‑16 Buttons is selected from the Layout menu.
-
 1
1 -
2
-
3
-
4
-
5
-
6
-
7
-
8
-
9
-
10
-
11
-
12
-
13
-
14
-
15
-
16
-
17
-
18
-
19
-
20
-
21
-
22
-
23
-
24
-
25
-
26
-
27
-
28
-
29
-
30
-
31
-
32
-
33
-
34
-
35
-
36
-
37
-
38
-
39
-
40
-
41
-
42
-
43
-
44
-
45
-
46
-
47
-
48
-
49
-
50
-
51
-
52
-
53
-
54
-
55
-
56
-
57
-
58
-
59
-
60
-
61
-
62
-
63
-
64
-
65
-
66
-
67
-
68
-
69
-
70
-
71
-
72
-
73
-
74
-
75
-
76
-
77
-
78
-
79
-
80
-
81
-
82
-
83
-
84
-
85
-
86
-
87
-
88
-
89
-
90
-
91
-
92
-
93
-
94
-
 95
95 -
 96
96 -
 97
97 -
 98
98 -
 99
99 -
 100
100 -
 101
101 -
 102
102 -
 103
103 -
 104
104 -
 105
105 -
106
-
107
-
108
-
109
-
110
-
111
-
112
-
113
-
114
-
115
-
116
-
117
-
118
-
119
-
120
-
121
-
122
-
123
-
124
-
125
-
126
-
127
-
128
-
129
-
130
-
131
-
132
-
133
-
134
-
135
-
136
-
137
-
138
-
139
-
140
-
141
-
142
-
143
-
144
-
145
-
146
 |
 |