Lexmark X925 Lexmark Document Distributor - Page 91
Managing solutions, Understanding the solution deployment process, Understanding solution settings
 |
View all Lexmark X925 manuals
Add to My Manuals
Save this manual to your list of manuals |
Page 91 highlights
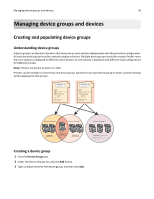
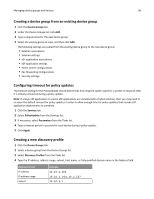
Managing solutions 91 Managing solutions Understanding the solution deployment process 1 Set servers offline to prevent execution of profiles before configuration is complete. For more information, see "Viewing and changing server status" on page 57. 2 Upload the solution to the LDD system and adjust global settings for the solution. 3 Create a device group to contain printers where the solution will be deployed. Note: Multifunction and single‑function printers are known as devices in LMC. 4 Create discovery profiles to add printers to the device group. 5 Discover printers in the device group according to the discovery profiles. 6 Add the solution to the device group and adjust local settings. 7 Configure home screens for the device group to use the deployed solution. 8 Update the device policies for the printers in the device group. 9 Set servers online. For more information, see "Viewing and changing server status" on page 57. Each step is covered in more detail in the following sections. Note: Some solutions may automatically complete any or all of steps 3 through 8 if the creator of the solution included auto‑configure. For more information, see the documentation associated with a specific solution. Understanding solution settings Setting type Global Local Location in LMC Initial configuration Scope Configuration task on the Solutions tab After uploading the solution in All printers in all device groups to which the LMC solution is applied, or all software clients in all software client groups to which the solution is applied Solutions task on the Device During deployment to a All printers in the selected device group, or Groups or Software Client Groups device group or assignment to all software clients in the selected software tab (Select a solution, and then a software client group client group click Edit.) Uploading solutions to the LDD system 1 Click the Solutions tab. 2 Select All Solutions from the Solutions list. 3 Click Install/Upgrade.
-
 1
1 -
2
-
3
-
4
-
5
-
6
-
7
-
8
-
9
-
10
-
11
-
12
-
13
-
14
-
15
-
16
-
17
-
18
-
19
-
20
-
21
-
22
-
23
-
24
-
25
-
26
-
27
-
28
-
29
-
30
-
31
-
32
-
33
-
34
-
35
-
36
-
37
-
38
-
39
-
40
-
41
-
42
-
43
-
44
-
45
-
46
-
47
-
48
-
49
-
50
-
51
-
52
-
53
-
54
-
55
-
56
-
57
-
58
-
59
-
60
-
61
-
62
-
63
-
64
-
65
-
66
-
67
-
68
-
69
-
70
-
71
-
72
-
73
-
74
-
75
-
76
-
77
-
78
-
79
-
80
-
81
-
82
-
83
-
84
-
85
-
 86
86 -
 87
87 -
 88
88 -
 89
89 -
 90
90 -
 91
91 -
 92
92 -
 93
93 -
 94
94 -
 95
95 -
 96
96 -
97
-
98
-
99
-
100
-
101
-
102
-
103
-
104
-
105
-
106
-
107
-
108
-
109
-
110
-
111
-
112
-
113
-
114
-
115
-
116
-
117
-
118
-
119
-
120
-
121
-
122
-
123
-
124
-
125
-
126
-
127
-
128
-
129
-
130
-
131
-
132
-
133
-
134
-
135
-
136
-
137
-
138
-
139
-
140
-
141
-
142
-
143
-
144
-
145
-
146
 |
 |