Lexmark X925 Lexmark Document Distributor - Page 115
Increasing LDD print queue availability using printer pooling, Properties, Run as, administrator
 |
View all Lexmark X925 manuals
Add to My Manuals
Save this manual to your list of manuals |
Page 115 highlights
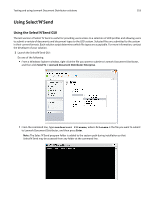
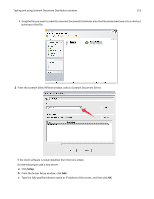
Managing software clients 115 Increasing LDD print queue availability using printer pooling You can use printer pooling for an LDD print queue on a print server in order to efficiently provide a single print queue to several users and avoid backups when large jobs are submitted. 1 In the printers control panel in Windows, right‑click an LDD print queue, and then click Properties. Note: When using Windows Vista or Windows Server 2008 with User Account Control enabled, click Run as administrator > Properties. 2 Click the Ports tab. 3 Select Enable printer pooling. 4 Click Add Port. 5 Select Lexmark Document Server Port ‑ Enterprise, and then click New Port. 6 Type a name for the new port, and then click Next. Note: The port name must be 75 characters or fewer. 7 Select the same Lexmark Document Server used for the initial port created for the selected LDD printer, and then click Next. 8 Select the same profile used for the initial port created for the selected LDD printer, and then click Next. Note: If the server is currently running a large number of jobs, then profiles on the server may not appear in the list. Wait until the server is not as busy, and then try adding the port again. 9 Click Finish, and then click Close to close the Printer Ports window. The new port appears and is selected in the port list in the printer properties window. 10 Repeat steps 4 through 9 to create additional Lexmark Document Server Printer Ports, assigning each port to the same profile. 11 Make sure all the newly created ports are selected in the ports list 12 Click Apply, and then click Close.
-
 1
1 -
2
-
3
-
4
-
5
-
6
-
7
-
8
-
9
-
10
-
11
-
12
-
13
-
14
-
15
-
16
-
17
-
18
-
19
-
20
-
21
-
22
-
23
-
24
-
25
-
26
-
27
-
28
-
29
-
30
-
31
-
32
-
33
-
34
-
35
-
36
-
37
-
38
-
39
-
40
-
41
-
42
-
43
-
44
-
45
-
46
-
47
-
48
-
49
-
50
-
51
-
52
-
53
-
54
-
55
-
56
-
57
-
58
-
59
-
60
-
61
-
62
-
63
-
64
-
65
-
66
-
67
-
68
-
69
-
70
-
71
-
72
-
73
-
74
-
75
-
76
-
77
-
78
-
79
-
80
-
81
-
82
-
83
-
84
-
85
-
86
-
87
-
88
-
89
-
90
-
91
-
92
-
93
-
94
-
95
-
96
-
97
-
98
-
99
-
100
-
101
-
102
-
103
-
104
-
105
-
106
-
107
-
108
-
109
-
 110
110 -
 111
111 -
 112
112 -
 113
113 -
 114
114 -
 115
115 -
 116
116 -
 117
117 -
 118
118 -
 119
119 -
 120
120 -
121
-
122
-
123
-
124
-
125
-
126
-
127
-
128
-
129
-
130
-
131
-
132
-
133
-
134
-
135
-
136
-
137
-
138
-
139
-
140
-
141
-
142
-
143
-
144
-
145
-
146
 |
 |