Lexmark X925 Lexmark Document Distributor - Page 105
Enabling secure communication between servers and printers in a device group
 |
View all Lexmark X925 manuals
Add to My Manuals
Save this manual to your list of manuals |
Page 105 highlights
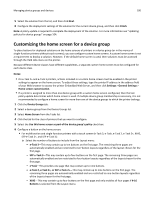
Managing device groups and devices 105 5 Type a description for the task, and then click Next. 6 If you are updating policies for printers in multiple device groups, then select the device groups for the policy update task in the main section. The list does not appear if a specific device group is selected in the Device Groups list. 7 Enter a start date and a start time. 8 Configure the frequency of the scheduled event, and then click Finish. Enabling secure communication between servers and printers in a device group Note: Secure communication between printers and servers is required when using a solution with Kerberos authentication. 1 Click the Device Groups tab. 2 Select a device group from the Device Groups list. 3 Select Security from the Tasks list. 4 Enable secure communication, and then click Apply: • To secure only the credentials such as user name and password of the session, select the Enabled for Credentials option. This option is faster than a communication that is set to "Enabled for Session." • To completely secure the session, select the Enabled for Session option. Disabling validation of eSF application deployment Validation that occurs during deployment of eSF applications causes policy updates that include eSF deployments to take significantly longer than those that do not. If you do not want to validate eSF application deployment on each printer, then do the following: Note: eSF settings configured using the eSF configuration task are not deployed when validation of eSF application deployment is disabled. 1 Click the Device Groups tab. 2 Select an appropriate device group from the list. 3 Select the eSF Configuration task. 4 Clear the Verify eSF application deployment and deploy these eSF settings check box, and then click Save Settings. 5 Repeat steps 2 through 4 for any other appropriate device groups.
-
 1
1 -
2
-
3
-
4
-
5
-
6
-
7
-
8
-
9
-
10
-
11
-
12
-
13
-
14
-
15
-
16
-
17
-
18
-
19
-
20
-
21
-
22
-
23
-
24
-
25
-
26
-
27
-
28
-
29
-
30
-
31
-
32
-
33
-
34
-
35
-
36
-
37
-
38
-
39
-
40
-
41
-
42
-
43
-
44
-
45
-
46
-
47
-
48
-
49
-
50
-
51
-
52
-
53
-
54
-
55
-
56
-
57
-
58
-
59
-
60
-
61
-
62
-
63
-
64
-
65
-
66
-
67
-
68
-
69
-
70
-
71
-
72
-
73
-
74
-
75
-
76
-
77
-
78
-
79
-
80
-
81
-
82
-
83
-
84
-
85
-
86
-
87
-
88
-
89
-
90
-
91
-
92
-
93
-
94
-
95
-
96
-
97
-
98
-
99
-
 100
100 -
 101
101 -
 102
102 -
 103
103 -
 104
104 -
 105
105 -
 106
106 -
 107
107 -
 108
108 -
 109
109 -
 110
110 -
111
-
112
-
113
-
114
-
115
-
116
-
117
-
118
-
119
-
120
-
121
-
122
-
123
-
124
-
125
-
126
-
127
-
128
-
129
-
130
-
131
-
132
-
133
-
134
-
135
-
136
-
137
-
138
-
139
-
140
-
141
-
142
-
143
-
144
-
145
-
146
 |
 |
