Lexmark X925 Lexmark Document Distributor - Page 66
Configuring chunk size for device discovery and policy updates, Configuring communications
 |
View all Lexmark X925 manuals
Add to My Manuals
Save this manual to your list of manuals |
Page 66 highlights
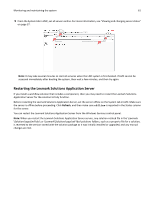
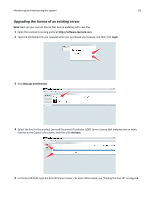
Monitoring and maintaining the system 66 3 For each server that should only run LMC, stop the associated worker on the clientloadbalancer and adaptorloadbalancer load balancing workers, that balance job requests: a In the "Worker Status for clientloadbalancer" section, click E beside the server name. b For Activation, select the Stopped option. c Click Update Worker. d Repeat these steps for the same server in the "Worker Status for adaptorbalancer" section. Notes: • Make sure at least one server is assigned to run LMC and at least one server is assigned to process jobs. • Changing other load balancer and server properties is not recommended in most cases. Configuring chunk size for device discovery and policy updates When using three or more servers, reducing the chunk size may increase the speed of device discovery and policy updates. 1 Click the Services tab. 2 Select General from the Services list. 3 Select Parameters from the Tasks list. 4 In the ChunkSize field, type a new value. When using three or more servers, a value as low as 2 may be appropriate. 5 Click Apply. Configuring communications Configuring connection to an SMTP server 1 Click the Services tab. 2 Select Email from the Services list. 3 Select Parameters from the Tasks list. 4 Type the password and user ID used to log on to your SMTP server. 5 Type the e‑mail server connection timeout in seconds. The default is 60. 6 Type the e‑mail server host name or IP address. 7 Enter the e‑mail server I/O timeout in seconds. 8 Click Apply.
-
 1
1 -
2
-
3
-
4
-
5
-
6
-
7
-
8
-
9
-
10
-
11
-
12
-
13
-
14
-
15
-
16
-
17
-
18
-
19
-
20
-
21
-
22
-
23
-
24
-
25
-
26
-
27
-
28
-
29
-
30
-
31
-
32
-
33
-
34
-
35
-
36
-
37
-
38
-
39
-
40
-
41
-
42
-
43
-
44
-
45
-
46
-
47
-
48
-
49
-
50
-
51
-
52
-
53
-
54
-
55
-
56
-
57
-
58
-
59
-
60
-
 61
61 -
 62
62 -
 63
63 -
 64
64 -
 65
65 -
 66
66 -
 67
67 -
 68
68 -
 69
69 -
 70
70 -
 71
71 -
72
-
73
-
74
-
75
-
76
-
77
-
78
-
79
-
80
-
81
-
82
-
83
-
84
-
85
-
86
-
87
-
88
-
89
-
90
-
91
-
92
-
93
-
94
-
95
-
96
-
97
-
98
-
99
-
100
-
101
-
102
-
103
-
104
-
105
-
106
-
107
-
108
-
109
-
110
-
111
-
112
-
113
-
114
-
115
-
116
-
117
-
118
-
119
-
120
-
121
-
122
-
123
-
124
-
125
-
126
-
127
-
128
-
129
-
130
-
131
-
132
-
133
-
134
-
135
-
136
-
137
-
138
-
139
-
140
-
141
-
142
-
143
-
144
-
145
-
146
 |
 |