Lexmark X925 Lexmark Document Distributor - Page 117
Using LDD print queues, Print, Properties, Preferences, Options, Setup
 |
View all Lexmark X925 manuals
Add to My Manuals
Save this manual to your list of manuals |
Page 117 highlights
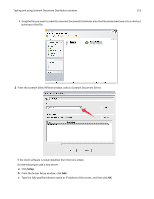
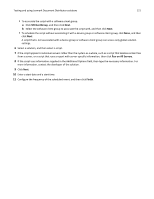
Testing and using Lexmark Document Distributor solutions 117 3 Touch the profile that you want to appear on the home screen. The profile launches the associated script on an LDD server. Documents are scanned as necessary, and any prompts included in the script are presented to the user. Note: When using a solution that reads a bar code, scan at 300 dpi for best results. Depending on the documents being scanned, using a higher setting for Darkness may also provide better results. Using LDD print queues 1 With a document open in Windows, click File > Print. 2 Select the printer associated with the Lexmark Document Server port and the profile you want to use. 3 To configure print options, click Properties, Preferences, Options, or Setup. See the documentation that came with the printer or print driver for more information about print options. Note: When using a solution that reads a bar code, print at 300 dpi, with the any other quality settings at the highest levels for best results. 4 Click OK to close any printer software dialogs. 5 Click OK or Print. The document is sent to the LDD system using the profile specified in the configuration of the Lexmark Document Server port associated with the selected printer. The file type is determined by the output of the print driver, and each solution determines the accepted file types.
-
 1
1 -
2
-
3
-
4
-
5
-
6
-
7
-
8
-
9
-
10
-
11
-
12
-
13
-
14
-
15
-
16
-
17
-
18
-
19
-
20
-
21
-
22
-
23
-
24
-
25
-
26
-
27
-
28
-
29
-
30
-
31
-
32
-
33
-
34
-
35
-
36
-
37
-
38
-
39
-
40
-
41
-
42
-
43
-
44
-
45
-
46
-
47
-
48
-
49
-
50
-
51
-
52
-
53
-
54
-
55
-
56
-
57
-
58
-
59
-
60
-
61
-
62
-
63
-
64
-
65
-
66
-
67
-
68
-
69
-
70
-
71
-
72
-
73
-
74
-
75
-
76
-
77
-
78
-
79
-
80
-
81
-
82
-
83
-
84
-
85
-
86
-
87
-
88
-
89
-
90
-
91
-
92
-
93
-
94
-
95
-
96
-
97
-
98
-
99
-
100
-
101
-
102
-
103
-
104
-
105
-
106
-
107
-
108
-
109
-
110
-
111
-
 112
112 -
 113
113 -
 114
114 -
 115
115 -
 116
116 -
 117
117 -
 118
118 -
 119
119 -
 120
120 -
 121
121 -
 122
122 -
123
-
124
-
125
-
126
-
127
-
128
-
129
-
130
-
131
-
132
-
133
-
134
-
135
-
136
-
137
-
138
-
139
-
140
-
141
-
142
-
143
-
144
-
145
-
146
 |
 |
