Lexmark X925 Lexmark Document Distributor - Page 59
Adding servers to the system after initial installation
 |
View all Lexmark X925 manuals
Add to My Manuals
Save this manual to your list of manuals |
Page 59 highlights
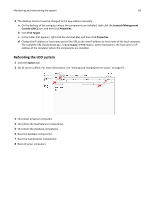
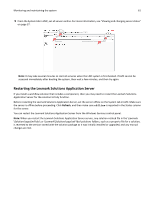
Monitoring and maintaining the system 59 5 Select a task from the "Task used to deliver confirmation page" list: • confirm.printPS-This prints a confirmation page in PostScript format. • confirm.printPDF-This prints a confirmation page in PDF format. • confirm.emailAdmin-This sends a message to the administrator e‑mail address with a PDF confirmation page attached. • confirm.emailAdminTextOnly-This sends a message containing the confirmation information to the administrator e‑mail address with no attachments. Note: The e‑mail service must be correctly configured to use confirm.emailAdmin or confirm.emailAdminTextOnly. 6 If you are using e‑mail confirmations, then type the address where e‑mail confirmations are sent in the "Admin email address" field. 7 Type a page title to appear on the confirmation page or message. 8 Edit the remaining parameters to determine the font settings for the title and page text. 9 Click Apply. Adding servers to the system after initial installation New servers may be added to an existing system to increase capacity, or servers may be replaced without reinstalling other components. When a new server is installed on a system that already has solutions, the solutions and all associated settings are added to the new server. However, any third‑party services used with existing solutions must be installed manually. If the new server is left without the same services as existing servers, any jobs that use the solution that is missing services on the new server will fail. 1 Add the computer where the server will be installed on the network, and make sure the time is synchronized using an NTP server. 2 Install the LDD server. For more information, see "Installing servers" on page 38. 3 Install any third‑party services required by existing solutions on the new server. 4 From the System tab in LMC, set the new server online. For more information, see "Viewing and changing server status" on page 57. Changing the IP address on a configuration 1 system If an incorrect IP address or fully qualified domain name is used when installing a configuration 1 system, or the IP address of the computer on which the components of a configuration 1 system are installed changes for any reason, then the IP address of the components can be changed without reinstallation. 1 From the command line on the computer where all components are installed, navigate to the Lexmark\Solutions \InstallHelper folder in the location where the components are installed. (The default is C:\Program Files\Lexmark \Solutions\InstallHelper.) 2 Type update‑addr.bat ‑hostname to use the fully qualified domain name of the local computer, and then press Enter or Type update‑addr.bat ‑ip to use the IP address of the local computer, and then press Enter.
-
 1
1 -
2
-
3
-
4
-
5
-
6
-
7
-
8
-
9
-
10
-
11
-
12
-
13
-
14
-
15
-
16
-
17
-
18
-
19
-
20
-
21
-
22
-
23
-
24
-
25
-
26
-
27
-
28
-
29
-
30
-
31
-
32
-
33
-
34
-
35
-
36
-
37
-
38
-
39
-
40
-
41
-
42
-
43
-
44
-
45
-
46
-
47
-
48
-
49
-
50
-
51
-
52
-
53
-
 54
54 -
 55
55 -
 56
56 -
 57
57 -
 58
58 -
 59
59 -
 60
60 -
 61
61 -
 62
62 -
 63
63 -
 64
64 -
65
-
66
-
67
-
68
-
69
-
70
-
71
-
72
-
73
-
74
-
75
-
76
-
77
-
78
-
79
-
80
-
81
-
82
-
83
-
84
-
85
-
86
-
87
-
88
-
89
-
90
-
91
-
92
-
93
-
94
-
95
-
96
-
97
-
98
-
99
-
100
-
101
-
102
-
103
-
104
-
105
-
106
-
107
-
108
-
109
-
110
-
111
-
112
-
113
-
114
-
115
-
116
-
117
-
118
-
119
-
120
-
121
-
122
-
123
-
124
-
125
-
126
-
127
-
128
-
129
-
130
-
131
-
132
-
133
-
134
-
135
-
136
-
137
-
138
-
139
-
140
-
141
-
142
-
143
-
144
-
145
-
146
 |
 |
