Lexmark X925 Lexmark Document Distributor - Page 67
Configuring NPA device communication, Configuring SNMP for discovering printers
 |
View all Lexmark X925 manuals
Add to My Manuals
Save this manual to your list of manuals |
Page 67 highlights
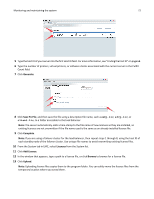
Monitoring and maintaining the system 67 Configuring NPA device communication Though the default port is usually used for NPA device communication, the timeout periods between retries can be changed to improve reliability during device discovery. 1 Click the Services tab. 2 Select NPA from the Services list. 3 Select Parameters from the Tasks list. 4 Type the port number used for NPA on your network in the Unsecure Port field. The default setting is 9300. 5 Type a timeout period in milliseconds for each retry in sequence, separating each by a space in the NPANT Timeout field. The default settings are 1000 and 5000. 6 Click Apply. Configuring SNMP for discovering printers 1 Click the Services tab. 2 Select SNMP from the Services list. 3 Select Parameters from the Tasks list. 4 In the Port field, type the port number used for SNMP on your network. The default is 161. 5 In the Write Community Name field, type the write community string for printers on your network. 6 In the Timeouts/Retries field, type a timeout period in milliseconds for each retry in sequence, separating each by a space. 7 In the Read Community Name field, type the read community string for printers on your network. 8 Click Apply. Configuring device security To enable communication with Basic Security template-enabled devices, make sure the Basic Security template matches the authentication type and the password or PIN configured in LMC. Only authentication through password or PIN is supported by LDD. 1 Click the Services tab. 2 Select DeviceSecurity from the Services list. 3 Select Parameters from the Tasks list. 4 Select the type of authentication for the device, and then type the password or PIN. 5 Click Apply.
-
 1
1 -
2
-
3
-
4
-
5
-
6
-
7
-
8
-
9
-
10
-
11
-
12
-
13
-
14
-
15
-
16
-
17
-
18
-
19
-
20
-
21
-
22
-
23
-
24
-
25
-
26
-
27
-
28
-
29
-
30
-
31
-
32
-
33
-
34
-
35
-
36
-
37
-
38
-
39
-
40
-
41
-
42
-
43
-
44
-
45
-
46
-
47
-
48
-
49
-
50
-
51
-
52
-
53
-
54
-
55
-
56
-
57
-
58
-
59
-
60
-
61
-
 62
62 -
 63
63 -
 64
64 -
 65
65 -
 66
66 -
 67
67 -
 68
68 -
 69
69 -
 70
70 -
 71
71 -
 72
72 -
73
-
74
-
75
-
76
-
77
-
78
-
79
-
80
-
81
-
82
-
83
-
84
-
85
-
86
-
87
-
88
-
89
-
90
-
91
-
92
-
93
-
94
-
95
-
96
-
97
-
98
-
99
-
100
-
101
-
102
-
103
-
104
-
105
-
106
-
107
-
108
-
109
-
110
-
111
-
112
-
113
-
114
-
115
-
116
-
117
-
118
-
119
-
120
-
121
-
122
-
123
-
124
-
125
-
126
-
127
-
128
-
129
-
130
-
131
-
132
-
133
-
134
-
135
-
136
-
137
-
138
-
139
-
140
-
141
-
142
-
143
-
144
-
145
-
146
 |
 |