Lexmark X925 Lexmark Document Distributor - Page 103
Custom, Change, Apply, Default, Task 2, e, and SFP e, Notes, Remove, or App Reservation
 |
View all Lexmark X925 manuals
Add to My Manuals
Save this manual to your list of manuals |
Page 103 highlights
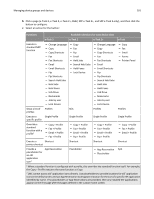
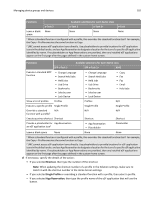
Managing device groups and devices 103 e Do the following to select a custom graphic that appears on the button for any action except Placeholder or App Reservation: 1 Click Custom. 2 Click Change, and then select a JPEG, GIF, PNG file for the Up and Down icons. 3 Click Apply. Note: If you want to use the default button icon, then click Default. Images selected will be resized to the following dimensions for each device class. For best results, resize or crop source images to the correct size before use. - e‑Task-120 x 80 pixels - e‑Task 2, e‑Task 2+, and SFP e‑Task 2+-120 x 75 pixels - e‑Task 3-172 x 254 pixels - X642-120 x 55 pixels f To apply custom text to any button except a Placeholder or App Reservation, select the Text option , and then type your custom text. You can also select the Text option and leave it blank to display only the icon. • For single‑function printers without a touch screen (SFP e‑Task, and, SFP e‑Task 2): a Select Custom from the Layout menu. b Click Add below the list of buttons. Notes: - The only action available is Single Profile. You cannot modify other menu items on a printer without a touch screen. - To remove a button, select it in the list, and then click Remove. c To apply custom text to the button, select the option for the custom text field beside Display Text, and then type your custom text. d Select a profile to associate with the button. 7 Configure the rest of the buttons on the home screen. 8 Click Apply to save changes. Note: If you change tabs during configuration, then new settings are temporarily saved for each tab during the current LMC session. However, you must click Apply on each tab to apply the settings specified on that tab.
-
 1
1 -
2
-
3
-
4
-
5
-
6
-
7
-
8
-
9
-
10
-
11
-
12
-
13
-
14
-
15
-
16
-
17
-
18
-
19
-
20
-
21
-
22
-
23
-
24
-
25
-
26
-
27
-
28
-
29
-
30
-
31
-
32
-
33
-
34
-
35
-
36
-
37
-
38
-
39
-
40
-
41
-
42
-
43
-
44
-
45
-
46
-
47
-
48
-
49
-
50
-
51
-
52
-
53
-
54
-
55
-
56
-
57
-
58
-
59
-
60
-
61
-
62
-
63
-
64
-
65
-
66
-
67
-
68
-
69
-
70
-
71
-
72
-
73
-
74
-
75
-
76
-
77
-
78
-
79
-
80
-
81
-
82
-
83
-
84
-
85
-
86
-
87
-
88
-
89
-
90
-
91
-
92
-
93
-
94
-
95
-
96
-
97
-
 98
98 -
 99
99 -
 100
100 -
 101
101 -
 102
102 -
 103
103 -
 104
104 -
 105
105 -
 106
106 -
 107
107 -
 108
108 -
109
-
110
-
111
-
112
-
113
-
114
-
115
-
116
-
117
-
118
-
119
-
120
-
121
-
122
-
123
-
124
-
125
-
126
-
127
-
128
-
129
-
130
-
131
-
132
-
133
-
134
-
135
-
136
-
137
-
138
-
139
-
140
-
141
-
142
-
143
-
144
-
145
-
146
 |
 |