Netgear WC7520 WC7520 Reference Manual - Page 17
Initial Connection and Configuration, Action buttons, Apply, Cancel, Remove, Delete - ap is rebooting
 |
UPC - 606449072969
View all Netgear WC7520 manuals
Add to My Manuals
Save this manual to your list of manuals |
Page 17 highlights
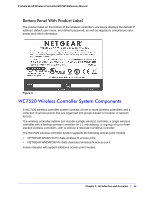
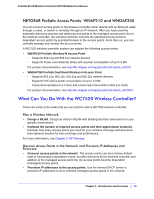
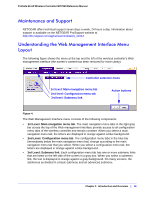
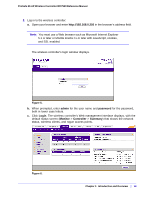
ProSafe 20-AP Wireless Controller WC7520 Reference Manual • Action buttons. Action buttons change the configuration or allow you to make changes to the configuration. These are the most common action buttons: - Apply. Saves all configuration changes made on the current screen. Saved settings are retained when the wireless controller is powered off or rebooted while unsaved configuration changes are lost. - Cancel. Resets options on the current screen to the last-applied or saved settings. - Add. Adds a new item to the current screen. Typically, a popup screen opens that enables you to enter information in additional fields. - Edit. Allows you to edit the configuration of the selected item. - Remove or Delete. Removes the selected item from the table or screen configuration. - Back. Return to the previous screen. - Next. Advance to the next screen. • Controller selection menu. In a stacked configuration, the controller selection menu lets you select the wireless controller to configure. Initial Connection and Configuration Follow the steps in this section to set up the wireless controller. For additional information, see the WC7520 ProSafe Wireless Controller Installation Guide at http://kb.netgear.com/app/products/model/a_id/13060. To set up, configure, and deploy the wireless controller: 1. Connect the wireless controller to your computer: a. Configure a computer with a static IP address of 192.168.0.210 and 255.255.255.0 as the subnet mask. b. Connect the wireless controller to the computer via the network or directly to one of the wireless controller's ports. c. Connect the power cord from the wireless controller to an AC power outlet. d. Check the lights on the front of the wireless controller: • Power. The green power light should be lit. If the power light is not lit, check the connections and check to see if the power outlet is controlled by a wall switch that is turned off. • Test. The Test light is on briefly when the controller is first turned on. • LAN The Ethernet (LAN) light should be lit (amber for 10/100 Mbps and green for 1000 Mbps) indicating that a connection has been made. If not, make sure the Ethernet cable is securely attached at both ends. Chapter 1: Introduction and Overview | 17
-
 1
1 -
2
-
3
-
4
-
5
-
6
-
7
-
8
-
9
-
10
-
11
-
 12
12 -
 13
13 -
 14
14 -
 15
15 -
 16
16 -
 17
17 -
 18
18 -
 19
19 -
 20
20 -
 21
21 -
 22
22 -
23
-
24
-
25
-
26
-
27
-
28
-
29
-
30
-
31
-
32
-
33
-
34
-
35
-
36
-
37
-
38
-
39
-
40
-
41
-
42
-
43
-
44
-
45
-
46
-
47
-
48
-
49
-
50
-
51
-
52
-
53
-
54
-
55
-
56
-
57
-
58
-
59
-
60
-
61
-
62
-
63
-
64
-
65
-
66
-
67
-
68
-
69
-
70
-
71
-
72
-
73
-
74
-
75
-
76
-
77
-
78
-
79
-
80
-
81
-
82
-
83
-
84
-
85
-
86
-
87
-
88
-
89
-
90
-
91
-
92
-
93
-
94
-
95
-
96
-
97
-
98
-
99
-
100
-
101
-
102
-
103
-
104
-
105
-
106
-
107
-
108
-
109
-
110
-
111
-
112
-
113
-
114
-
115
-
116
-
117
-
118
-
119
-
120
-
121
-
122
-
123
-
124
-
125
-
126
-
127
-
128
-
129
-
130
-
131
-
132
-
133
-
134
-
135
-
136
-
137
-
138
-
139
-
140
-
141
-
142
-
143
-
144
-
145
-
146
-
147
-
148
-
149
-
150
-
151
-
152
-
153
-
154
-
155
-
156
-
157
-
158
-
159
-
160
-
161
-
162
 |
 |