Netgear WC7520 WC7520 Reference Manual - Page 21
Choosing a Location for the Wireless Controller, Deploying the Wireless Controller - default ip
 |
UPC - 606449072969
View all Netgear WC7520 manuals
Add to My Manuals
Save this manual to your list of manuals |
Page 21 highlights
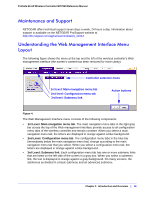
ProSafe 20-AP Wireless Controller WC7520 Reference Manual Choosing a Location for the Wireless Controller The wireless controller is suitable for use in an office environment where it can be freestanding on its runner feet or mounted into a standard 19-inch equipment rack. Alternatively, you can rack-mount the wireless controller in a wiring closet or equipment room. A mounting kit, containing two mounting brackets and screws is provided in the wireless controller package. Consider the following when deciding where to position the wireless controller: • The unit is accessible and cables can be connected easily. • Cabling is away from sources of electrical noise. These include lift shafts, microwave ovens, and air-conditioning units. • Water or moisture cannot enter the case of the unit. • Airflow around the unit and through the vents in the side of the case is not restricted. Provide a minimum of 25 mm or 1 inch clearance. • The air is as free of dust as possible. • Temperature operating limits are not likely to be exceeded. Install the unit in a clean, air-conditioned environment. For information about the recommended operating temperatures for the wireless controller, see Factory Default Settings and Technical Specifications in Appendix A. Deploying the Wireless Controller To deploy the wireless controller: 1. Disconnect the wireless controller from the computer and place it where you will deploy it. If needed, you can now reconfigure the computer that you used in the configuration process back to its original TCP/IP settings. 2. Connect an Ethernet cable from your wireless controller to a LAN port on your network. 3. Connect the power cord to the wireless controller and plug the power cord into a power outlet. The Power, Test, and Ethernet LEDs should light up. If any of these do not light up, see Troubleshooting Basic Functioning on page 144. Chapter 1: Introduction and Overview | 21
-
 1
1 -
2
-
3
-
4
-
5
-
6
-
7
-
8
-
9
-
10
-
11
-
12
-
13
-
14
-
15
-
 16
16 -
 17
17 -
 18
18 -
 19
19 -
 20
20 -
 21
21 -
 22
22 -
 23
23 -
 24
24 -
 25
25 -
 26
26 -
27
-
28
-
29
-
30
-
31
-
32
-
33
-
34
-
35
-
36
-
37
-
38
-
39
-
40
-
41
-
42
-
43
-
44
-
45
-
46
-
47
-
48
-
49
-
50
-
51
-
52
-
53
-
54
-
55
-
56
-
57
-
58
-
59
-
60
-
61
-
62
-
63
-
64
-
65
-
66
-
67
-
68
-
69
-
70
-
71
-
72
-
73
-
74
-
75
-
76
-
77
-
78
-
79
-
80
-
81
-
82
-
83
-
84
-
85
-
86
-
87
-
88
-
89
-
90
-
91
-
92
-
93
-
94
-
95
-
96
-
97
-
98
-
99
-
100
-
101
-
102
-
103
-
104
-
105
-
106
-
107
-
108
-
109
-
110
-
111
-
112
-
113
-
114
-
115
-
116
-
117
-
118
-
119
-
120
-
121
-
122
-
123
-
124
-
125
-
126
-
127
-
128
-
129
-
130
-
131
-
132
-
133
-
134
-
135
-
136
-
137
-
138
-
139
-
140
-
141
-
142
-
143
-
144
-
145
-
146
-
147
-
148
-
149
-
150
-
151
-
152
-
153
-
154
-
155
-
156
-
157
-
158
-
159
-
160
-
161
-
162
 |
 |