Actiontec MI424WR User Guide - Page 12
Connecting the Router, Setting Up the Router - setup
 |
View all Actiontec MI424WR manuals
Add to My Manuals
Save this manual to your list of manuals |
Page 12 highlights
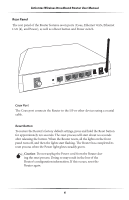
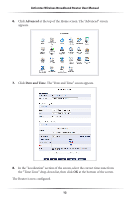
Connecting the Router 2 Connecting a computer or local network to the Wireless Broadband Router is a simple procedure, varying slightly depending on the computer's operating system, and designed to seamlessly integrate the Router with the computer or local network. Moreover, zero-configuration is attained when taking advantage of Universal Plug-and-Play support in Windows XP. The Windows default network settings dictate that in most cases, the setup procedure described in the "Computer Network Configuration" will be unnecessary. For example, the default DHCP setting in Windows 2000 is "client," requiring no further modification. However, Actiontec advises following the setup procedure described below to verify all communication parameters are valid and the physical cable connections are correct. Setting Up the Router There are three parts to setting up the Router: Connecting the Cables, Configuring the Router, and Connecting Other Computers/Set Top Boxes. Connecting the Cables ☞ Note: If a different router was being used, disconnect it. Remove all router components, including power supplies and cables, since they will not work with the Wireless Broadband Router. 1. Get the Router and black Power cord from the box. 2. Plug the black Power cord in the black port on the back of the Router and then into a power outlet. 3. Turn the Router on. 4. Make sure the Power light on the front of the Router is glows steadily green. 5. Plug the yellow Ethernet cable from the box into one of the four yellow Ethernet ports on the back of the Router. 9
-
 1
1 -
2
-
3
-
4
-
5
-
6
-
 7
7 -
 8
8 -
 9
9 -
 10
10 -
 11
11 -
 12
12 -
 13
13 -
 14
14 -
 15
15 -
 16
16 -
 17
17 -
18
-
19
-
20
-
21
-
22
-
23
-
24
-
25
-
26
-
27
-
28
-
29
-
30
-
31
-
32
-
33
-
34
-
35
-
36
-
37
-
38
-
39
-
40
-
41
-
42
-
43
-
44
-
45
-
46
-
47
-
48
-
49
-
50
-
51
-
52
-
53
-
54
-
55
-
56
-
57
-
58
-
59
-
60
-
61
-
62
-
63
-
64
-
65
-
66
-
67
-
68
-
69
-
70
-
71
-
72
-
73
-
74
-
75
-
76
-
77
-
78
-
79
-
80
-
81
-
82
-
83
-
84
-
85
-
86
-
87
-
88
-
89
-
90
-
91
-
92
-
93
-
94
-
95
-
96
-
97
-
98
-
99
-
100
-
101
-
102
-
103
-
104
-
105
-
106
-
107
-
108
-
109
-
110
-
111
-
112
-
113
-
114
-
115
-
116
-
117
-
118
-
119
-
120
-
121
-
122
-
123
-
124
-
125
-
126
-
127
-
128
-
129
-
130
-
131
-
132
-
133
-
134
-
135
-
136
-
137
-
138
-
139
-
140
-
141
-
142
-
143
-
144
-
145
-
146
-
147
-
148
-
149
-
150
-
151
-
152
-
153
-
154
-
155
-
156
-
157
-
158
-
159
-
160
-
161
-
162
-
163
-
164
-
165
-
166
-
167
-
168
-
169
-
170
-
171
 |
 |