Actiontec MI424WR User Guide - Page 50
Home/Office, New IP Range, Basic, Advanced
 |
View all Actiontec MI424WR manuals
Add to My Manuals
Save this manual to your list of manuals |
Page 50 highlights
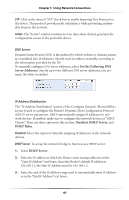
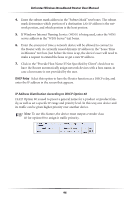
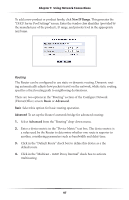
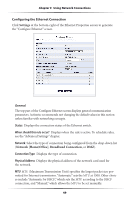
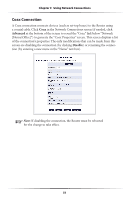
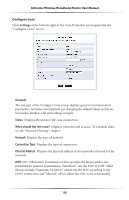
Chapter 5 Using Network Connections To add a new product or product family, click New IP Range. This generates the "DHCP Server Pool Settings" screen. Enter the vendor class identifier (provided by the manufacturer of the product), IP range, and priority level in the appropriate text boxes. Routing The Router can be configured to use static or dynamic routing. Dynamic routing automatically adjusts how packets travel on the network, while static routing specifies a fixed routing path to neighboring destinations. There are two options in the "Routing" section of the Configure Network (Home/Office) screen: Basic or Advanced. Basic Select this option for basic routing operation. Advanced To set up the Router's network bridge for advanced routing: 1. Select Advanced from the "Routing" drop-down menu. 2. Enter a device metric in the "Device Metric" text box. The device metric is a value used by the Router to determine whether one route is superior to another, considering parameters such as bandwidth and delay time. 3. Click in the "Default Route" check box to define this device as a the default route. 4. Click in the "Multicast - IGMP Proxy Internal" check box to activate multicasting. 47
-
 1
1 -
2
-
3
-
4
-
5
-
6
-
7
-
8
-
9
-
10
-
11
-
12
-
13
-
14
-
15
-
16
-
17
-
18
-
19
-
20
-
21
-
22
-
23
-
24
-
25
-
26
-
27
-
28
-
29
-
30
-
31
-
32
-
33
-
34
-
35
-
36
-
37
-
38
-
39
-
40
-
41
-
42
-
43
-
44
-
 45
45 -
 46
46 -
 47
47 -
 48
48 -
 49
49 -
 50
50 -
 51
51 -
 52
52 -
 53
53 -
 54
54 -
 55
55 -
56
-
57
-
58
-
59
-
60
-
61
-
62
-
63
-
64
-
65
-
66
-
67
-
68
-
69
-
70
-
71
-
72
-
73
-
74
-
75
-
76
-
77
-
78
-
79
-
80
-
81
-
82
-
83
-
84
-
85
-
86
-
87
-
88
-
89
-
90
-
91
-
92
-
93
-
94
-
95
-
96
-
97
-
98
-
99
-
100
-
101
-
102
-
103
-
104
-
105
-
106
-
107
-
108
-
109
-
110
-
111
-
112
-
113
-
114
-
115
-
116
-
117
-
118
-
119
-
120
-
121
-
122
-
123
-
124
-
125
-
126
-
127
-
128
-
129
-
130
-
131
-
132
-
133
-
134
-
135
-
136
-
137
-
138
-
139
-
140
-
141
-
142
-
143
-
144
-
145
-
146
-
147
-
148
-
149
-
150
-
151
-
152
-
153
-
154
-
155
-
156
-
157
-
158
-
159
-
160
-
161
-
162
-
163
-
164
-
165
-
166
-
167
-
168
-
169
-
170
-
171
 |
 |
