Actiontec MI424WR User Guide - Page 68
WAN PPPoE/WAN PPPoE 2, standards: Point-to-Point Protocol and Ethernet.
 |
View all Actiontec MI424WR manuals
Add to My Manuals
Save this manual to your list of manuals |
Page 68 highlights
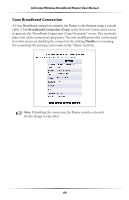
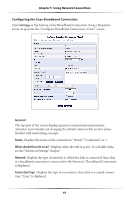
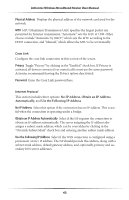
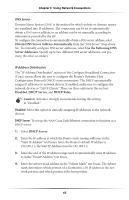
Chapter 5 Using Network Connections Routing Table Click New Route to generate the "New Route" window, where a new route can be configured. Internet Connection Firewall Click in the "Enabled" check box to activate the Router's firewall on the connection. Actiontec does NOT recommend activating this feature. Additional IP Addresses Click New IP Address to generate the "Additional IP Address Settings" screen, where additional IP addresses can be created to access the Router via the connection. WAN PPPoE/WAN PPPoE 2 WAN Point-to-Point Protocol over Ethernet (PPPoE) relies on two widely accepted standards: Point-to-Point Protocol and Ethernet. PPPoE enables Ethernet networked computers to exchange information with computers on the Internet. PPPoE supports the protocol layers and authentication widely used in PPP and enables a point-to-point connection to be established in the normally multipoint architecture of Ethernet. A discovery process in PPPoE determines the Ethernet MAC address of the remote device in order to establish a session. Click WAN PPPoE in the Network Connections screen to generate the "WAN PPPoE Properties" screen. This screen displays a list of the connection's properties. The only modifications that can be made from this screen are disabling the connection (by clicking Disable) or renaming the connection (by entering a new name in the "Name" text box). 65
-
 1
1 -
2
-
3
-
4
-
5
-
6
-
7
-
8
-
9
-
10
-
11
-
12
-
13
-
14
-
15
-
16
-
17
-
18
-
19
-
20
-
21
-
22
-
23
-
24
-
25
-
26
-
27
-
28
-
29
-
30
-
31
-
32
-
33
-
34
-
35
-
36
-
37
-
38
-
39
-
40
-
41
-
42
-
43
-
44
-
45
-
46
-
47
-
48
-
49
-
50
-
51
-
52
-
53
-
54
-
55
-
56
-
57
-
58
-
59
-
60
-
61
-
62
-
 63
63 -
 64
64 -
 65
65 -
 66
66 -
 67
67 -
 68
68 -
 69
69 -
 70
70 -
 71
71 -
 72
72 -
 73
73 -
74
-
75
-
76
-
77
-
78
-
79
-
80
-
81
-
82
-
83
-
84
-
85
-
86
-
87
-
88
-
89
-
90
-
91
-
92
-
93
-
94
-
95
-
96
-
97
-
98
-
99
-
100
-
101
-
102
-
103
-
104
-
105
-
106
-
107
-
108
-
109
-
110
-
111
-
112
-
113
-
114
-
115
-
116
-
117
-
118
-
119
-
120
-
121
-
122
-
123
-
124
-
125
-
126
-
127
-
128
-
129
-
130
-
131
-
132
-
133
-
134
-
135
-
136
-
137
-
138
-
139
-
140
-
141
-
142
-
143
-
144
-
145
-
146
-
147
-
148
-
149
-
150
-
151
-
152
-
153
-
154
-
155
-
156
-
157
-
158
-
159
-
160
-
161
-
162
-
163
-
164
-
165
-
166
-
167
-
168
-
169
-
170
-
171
 |
 |
