Actiontec MI424WR User Guide - Page 62
Routing Table, Internet Connection Firewall, Additional IP Addresses, New Route, New IP Address
 |
View all Actiontec MI424WR manuals
Add to My Manuals
Save this manual to your list of manuals |
Page 62 highlights
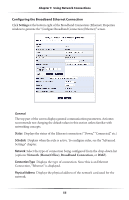
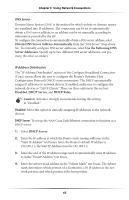
Chapter 5 Using Network Connections 3. Click in the "Default Route" check box to define this device as a the default route. 4. Click in the "Multicast - IGMP Proxy Internal" check box to activate multi- casting. Routing Table Clicking New Route generates the "New Route" window, where a new route can be configured. Internet Connection Firewall Click in the "Enabled" check box to activate the Router's firewall on the connection. Additional IP Addresses Clicking New IP Address generates the "Additional IP Address Settings" screen, where additional IP addresses can be created to access the Router via the connection. 59
-
 1
1 -
2
-
3
-
4
-
5
-
6
-
7
-
8
-
9
-
10
-
11
-
12
-
13
-
14
-
15
-
16
-
17
-
18
-
19
-
20
-
21
-
22
-
23
-
24
-
25
-
26
-
27
-
28
-
29
-
30
-
31
-
32
-
33
-
34
-
35
-
36
-
37
-
38
-
39
-
40
-
41
-
42
-
43
-
44
-
45
-
46
-
47
-
48
-
49
-
50
-
51
-
52
-
53
-
54
-
55
-
56
-
 57
57 -
 58
58 -
 59
59 -
 60
60 -
 61
61 -
 62
62 -
 63
63 -
 64
64 -
 65
65 -
 66
66 -
 67
67 -
68
-
69
-
70
-
71
-
72
-
73
-
74
-
75
-
76
-
77
-
78
-
79
-
80
-
81
-
82
-
83
-
84
-
85
-
86
-
87
-
88
-
89
-
90
-
91
-
92
-
93
-
94
-
95
-
96
-
97
-
98
-
99
-
100
-
101
-
102
-
103
-
104
-
105
-
106
-
107
-
108
-
109
-
110
-
111
-
112
-
113
-
114
-
115
-
116
-
117
-
118
-
119
-
120
-
121
-
122
-
123
-
124
-
125
-
126
-
127
-
128
-
129
-
130
-
131
-
132
-
133
-
134
-
135
-
136
-
137
-
138
-
139
-
140
-
141
-
142
-
143
-
144
-
145
-
146
-
147
-
148
-
149
-
150
-
151
-
152
-
153
-
154
-
155
-
156
-
157
-
158
-
159
-
160
-
161
-
162
-
163
-
164
-
165
-
166
-
167
-
168
-
169
-
170
-
171
 |
 |

59
Chapter 5
Using Network Connections
3.
Click in the “Default Route” check box to define this device as a the default
route.
4.
Click in the “Multicast -
IGMP
Proxy Internal” check box to activate multi-
casting.
Routing Table
Clicking
New Route
generates the “New Route” window, where a new route can
be configured.
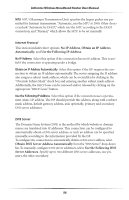
Internet Connection Firewall
Click in the “Enabled” check box to activate the Router’s firewall on the connection.
Additional IP Addresses
Clicking
New IP Address
generates the “Additional
IP
Address Settings” screen, where
additional
IP
addresses can be created to access the Router via the connection.