Actiontec MI424WR User Guide - Page 24
not, Hostname Resolution Failed appears. Click, Block Internet Services
 |
View all Actiontec MI424WR manuals
Add to My Manuals
Save this manual to your list of manuals |
Page 24 highlights
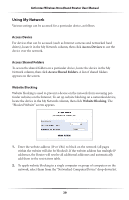
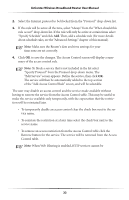
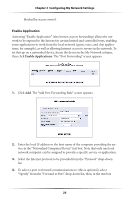
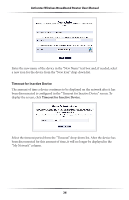
Chapter 3 Configuring My Network Settings 3. If website blocking needs to be active all the time, select "Always" from the "When should this rule occur?" drop-down list. If the rule will only be active at certain times select "Specify Schedule" and click Add. Then, add a schedule rule (for more details about schedule rules, see the "Advanced Settings" chapter of this manual). ☞ Note: Make sure the Router's date and time settings for your time zone are set correctly. 4. Click OK to add the website to the table. The previous screen appears while the Router attempts to find the site. "Resolving..." appears in the "Status" column while the site is being located. 5. If the site is successfully located, "Resolved" appears in the Status column. If not, "Hostname Resolution Failed" appears. Click Refresh to update the status if necessary. If the Router fails to locate the website, do the following: • Use a web browser to verify the website is available. If it is, the website address was entered incorrectly. See "Modifying a Website Address," below. • If the website is not available, return to the Website Blocking screen at a later time and click Resolve Now to verify the website can be found and blocked by the Router. Block Internet Services Internet services blocking is used to prevent a device on the network from accessing particular services on the Internet, such as receiving E-mail or downloading from FTP sites. To set up Internet services blocking on a networked device, locate the device in the My Network column, then click Block Internet Services. The "Add Access Control Rule" screen appears. 1. If this access control rule applies to all networked devices, select "Any" from the "Networked Computer/Device" list box. If this rule applies to certain devices only, select "Specify Address" and click Add. Then, add a network object (for more details about adding network objects, see the "Advanced Settings" chapter of this manual). 21
-
 1
1 -
2
-
3
-
4
-
5
-
6
-
7
-
8
-
9
-
10
-
11
-
12
-
13
-
14
-
15
-
16
-
17
-
18
-
 19
19 -
 20
20 -
 21
21 -
 22
22 -
 23
23 -
 24
24 -
 25
25 -
 26
26 -
 27
27 -
 28
28 -
 29
29 -
30
-
31
-
32
-
33
-
34
-
35
-
36
-
37
-
38
-
39
-
40
-
41
-
42
-
43
-
44
-
45
-
46
-
47
-
48
-
49
-
50
-
51
-
52
-
53
-
54
-
55
-
56
-
57
-
58
-
59
-
60
-
61
-
62
-
63
-
64
-
65
-
66
-
67
-
68
-
69
-
70
-
71
-
72
-
73
-
74
-
75
-
76
-
77
-
78
-
79
-
80
-
81
-
82
-
83
-
84
-
85
-
86
-
87
-
88
-
89
-
90
-
91
-
92
-
93
-
94
-
95
-
96
-
97
-
98
-
99
-
100
-
101
-
102
-
103
-
104
-
105
-
106
-
107
-
108
-
109
-
110
-
111
-
112
-
113
-
114
-
115
-
116
-
117
-
118
-
119
-
120
-
121
-
122
-
123
-
124
-
125
-
126
-
127
-
128
-
129
-
130
-
131
-
132
-
133
-
134
-
135
-
136
-
137
-
138
-
139
-
140
-
141
-
142
-
143
-
144
-
145
-
146
-
147
-
148
-
149
-
150
-
151
-
152
-
153
-
154
-
155
-
156
-
157
-
158
-
159
-
160
-
161
-
162
-
163
-
164
-
165
-
166
-
167
-
168
-
169
-
170
-
171
 |
 |
