Actiontec MI424WR User Guide - Page 66
Obtain DNS Server Address Automatically, Use the Following DNS, Server Addresses, Disabled
 |
View all Actiontec MI424WR manuals
Add to My Manuals
Save this manual to your list of manuals |
Page 66 highlights
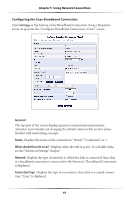
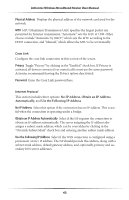
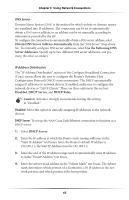
Chapter 5 Using Network Connections DNS Server Domain Name System (DNS) is the method by which website or domain names are translated into IP addresses. The connection can be set to automatically obtain a DNS server address, or an address can be set manually, according to information provided by the ISP. To configure the connection to automatically obtain a DNS server address, select Obtain DNS Server Address Automatically from the "DNS Server" drop-down list. To manually configure DNS server addresses, select Use the Following DNS Server Addresses. Specify up to two different DNS server addresses, one primary, the other secondary. IP Address Distribution The "IP Address Distribution" section of the Configure Broadband Connection (Coax) screen allows the user to configure the Router's Dynamic Host Configuration Protocol (DHCP) server parameters. The DHCP automatically assigns IP addresses to network devices. If enabled, make sure to configure the network devices as "DHCP Clients." There are three options in this section: Disabled, DHCP Server, and DHCP Relay. MCaution: Actiontec strongly recommends leaving this setting at "Disabled." Disabled Select this option if statically assigning IP addresses to the network devices. DHCP Server To set up the WAN Coax Link Ethernet connection to function as a DHCP server: 1. Select DHCP Server. 2. Enter the IP address at which the Router starts issuing addresses in the "Start IP Address" text boxes. Since the Router's default IP address is 192.168.1.1, the Start IP Address must be 192.168.1.2. 3. Enter the end of the IP address range used to automatically issue IP addresses in the "End IP Address" text boxes. 4. Enter the subnet mask address in the "Subnet Mask" text boxes. The subnet mask determines which portion of a destination LAN IP address is the network portion, and which portion is the host portion. 63
-
 1
1 -
2
-
3
-
4
-
5
-
6
-
7
-
8
-
9
-
10
-
11
-
12
-
13
-
14
-
15
-
16
-
17
-
18
-
19
-
20
-
21
-
22
-
23
-
24
-
25
-
26
-
27
-
28
-
29
-
30
-
31
-
32
-
33
-
34
-
35
-
36
-
37
-
38
-
39
-
40
-
41
-
42
-
43
-
44
-
45
-
46
-
47
-
48
-
49
-
50
-
51
-
52
-
53
-
54
-
55
-
56
-
57
-
58
-
59
-
60
-
 61
61 -
 62
62 -
 63
63 -
 64
64 -
 65
65 -
 66
66 -
 67
67 -
 68
68 -
 69
69 -
 70
70 -
 71
71 -
72
-
73
-
74
-
75
-
76
-
77
-
78
-
79
-
80
-
81
-
82
-
83
-
84
-
85
-
86
-
87
-
88
-
89
-
90
-
91
-
92
-
93
-
94
-
95
-
96
-
97
-
98
-
99
-
100
-
101
-
102
-
103
-
104
-
105
-
106
-
107
-
108
-
109
-
110
-
111
-
112
-
113
-
114
-
115
-
116
-
117
-
118
-
119
-
120
-
121
-
122
-
123
-
124
-
125
-
126
-
127
-
128
-
129
-
130
-
131
-
132
-
133
-
134
-
135
-
136
-
137
-
138
-
139
-
140
-
141
-
142
-
143
-
144
-
145
-
146
-
147
-
148
-
149
-
150
-
151
-
152
-
153
-
154
-
155
-
156
-
157
-
158
-
159
-
160
-
161
-
162
-
163
-
164
-
165
-
166
-
167
-
168
-
169
-
170
-
171
 |
 |
