Actiontec MI424WR User Guide - Page 38
Configuring a Wireless Windows XP Client, in the Control Panel. The Network
 |
View all Actiontec MI424WR manuals
Add to My Manuals
Save this manual to your list of manuals |
Page 38 highlights
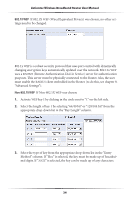
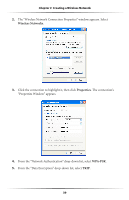
Chapter 4 Creating a Wireless Network 4. Enter the key in the appropriate text box in the "Encryption Key" column. If 64/40 bit was chosen in step 2, enter 10 characters. If 128/104 bit was chosen, enter 24 characters. Depending on what option was selected in step 3, enter hexadecimal or ASCII characters. 5. Click OK to save changes. Internet Connection Firewall Click in the "Enabled" check box to activate the Router's firewall on the wireless connection. Actiontec recommends leaving this option deactivated. Additional IP Addresses Clicking New IP Address generates the "Additional IP Address Settings" screen, where additional IP addresses can be created to access the Router via the wireless connection. Configuring a Wireless Windows XP Client If the computer has wireless capabilities and is running Windows XP, it will automatically recognize this and create a wireless connection. View this connection under Windows' "Network Connections." ☞ Note: The following description and images are in accordance with Microsoft Windows XP, Version 2002, running Service Pack 2. If running another operating system, see the documentation that came with the wireless adapter being used. 1. Click Network Connections in the Control Panel. The "Network Connections" window appears. 35
-
 1
1 -
2
-
3
-
4
-
5
-
6
-
7
-
8
-
9
-
10
-
11
-
12
-
13
-
14
-
15
-
16
-
17
-
18
-
19
-
20
-
21
-
22
-
23
-
24
-
25
-
26
-
27
-
28
-
29
-
30
-
31
-
32
-
 33
33 -
 34
34 -
 35
35 -
 36
36 -
 37
37 -
 38
38 -
 39
39 -
 40
40 -
 41
41 -
 42
42 -
 43
43 -
44
-
45
-
46
-
47
-
48
-
49
-
50
-
51
-
52
-
53
-
54
-
55
-
56
-
57
-
58
-
59
-
60
-
61
-
62
-
63
-
64
-
65
-
66
-
67
-
68
-
69
-
70
-
71
-
72
-
73
-
74
-
75
-
76
-
77
-
78
-
79
-
80
-
81
-
82
-
83
-
84
-
85
-
86
-
87
-
88
-
89
-
90
-
91
-
92
-
93
-
94
-
95
-
96
-
97
-
98
-
99
-
100
-
101
-
102
-
103
-
104
-
105
-
106
-
107
-
108
-
109
-
110
-
111
-
112
-
113
-
114
-
115
-
116
-
117
-
118
-
119
-
120
-
121
-
122
-
123
-
124
-
125
-
126
-
127
-
128
-
129
-
130
-
131
-
132
-
133
-
134
-
135
-
136
-
137
-
138
-
139
-
140
-
141
-
142
-
143
-
144
-
145
-
146
-
147
-
148
-
149
-
150
-
151
-
152
-
153
-
154
-
155
-
156
-
157
-
158
-
159
-
160
-
161
-
162
-
163
-
164
-
165
-
166
-
167
-
168
-
169
-
170
-
171
 |
 |