Asus PCI-DA2100 User Manual - Page 157
Other, Requires, provided, hardware, manufacturer, DA-2000 Series RAID Miniport for NT v4.0
 |
View all Asus PCI-DA2100 manuals
Add to My Manuals
Save this manual to your list of manuals |
Page 157 highlights
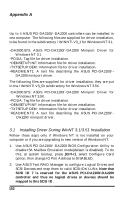
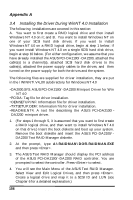
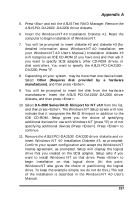
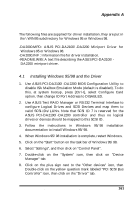
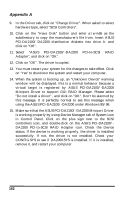
Appendix A 5. Press and exit the ASUS Text RAID Manager. Remove the ASUS PCI-DA2100/-DA2200 driver diskette. 6. Insert the Windows NT 4.0 Installation Diskette #1. Reset the computer to begin installation of Windows NT. 7. You will be prompted to insert diskette #2 and diskette #3 (for detailed information about Windows NT 4.0 installation, see your Windows NT 4.0 User's Manual.) Installation diskette #3 will recognize an IDE CD-ROM (if you have one) and then ask if you want to specify SCSI adapters, other CD-ROM drives, or disk controllers. You want to specify the ASUS PCI-DA2100/DA2200. Press "S". 8. Depending on your system, may be more than one device listed. Select Other (Requires disk provided by a hardware manufacturer), and then press . 9. You will be prompted to insert the disk from the hardware manufacturer. Insert the ASUS PCI-DA2100/-DA2200 driver diskette, and then press . 10. Select DA-2000 Series RAID Miniport for NT v4.0 from the list, and then press . The Windows NT Setup screen will now indicate that it recognizes the RAID Miniport in addition to the IDE CD-ROM. Setup gives you the choice of specifying additional devices for use with Windows NT (press "S") or of not specifying additional devices (Press ). Press to continue. 11. Remove the ASUS PCI-DA2100/-DA2200 driver diskette and reinsert Windows NT 4.0 Installation Diskette #3, as prompted. Confirm your system configuration and accept the Windows NT license agreement, as prompted. Setup will display the logical drive that you created on the SCSI adapter. Setup asks if you want to install Windows NT on that drive. Press to begin installation on that logical drive. (At this point, Windows NT also gives the choice of partitioning the logical drive. To keep the example simple, we do not do this.) The rest of the installation is described in the Windows NT 4.0 User's Manual. ASUS PCI-DA2100/PCI-DA2200 User's Manual 157
-
 1
1 -
2
-
3
-
4
-
5
-
6
-
7
-
8
-
9
-
10
-
11
-
12
-
13
-
14
-
15
-
16
-
17
-
18
-
19
-
20
-
21
-
22
-
23
-
24
-
25
-
26
-
27
-
28
-
29
-
30
-
31
-
32
-
33
-
34
-
35
-
36
-
37
-
38
-
39
-
40
-
41
-
42
-
43
-
44
-
45
-
46
-
47
-
48
-
49
-
50
-
51
-
52
-
53
-
54
-
55
-
56
-
57
-
58
-
59
-
60
-
61
-
62
-
63
-
64
-
65
-
66
-
67
-
68
-
69
-
70
-
71
-
72
-
73
-
74
-
75
-
76
-
77
-
78
-
79
-
80
-
81
-
82
-
83
-
84
-
85
-
86
-
87
-
88
-
89
-
90
-
91
-
92
-
93
-
94
-
95
-
96
-
97
-
98
-
99
-
100
-
101
-
102
-
103
-
104
-
105
-
106
-
107
-
108
-
109
-
110
-
111
-
112
-
113
-
114
-
115
-
116
-
117
-
118
-
119
-
120
-
121
-
122
-
123
-
124
-
125
-
126
-
127
-
128
-
129
-
130
-
131
-
132
-
133
-
134
-
135
-
136
-
137
-
138
-
139
-
140
-
141
-
142
-
143
-
144
-
145
-
146
-
147
-
148
-
149
-
150
-
151
-
 152
152 -
 153
153 -
 154
154 -
 155
155 -
 156
156 -
 157
157 -
 158
158 -
 159
159 -
 160
160 -
 161
161 -
 162
162 -
163
-
164
-
165
-
166
-
167
-
168
-
169
-
170
-
171
-
172
-
173
-
174
-
175
-
176
-
177
-
178
-
179
-
180
-
181
-
182
-
183
-
184
-
185
-
186
-
187
-
188
-
189
-
190
-
191
-
192
-
193
-
194
-
195
-
196
-
197
-
198
-
199
-
200
-
201
-
202
-
203
-
204
-
205
-
206
-
207
-
208
-
209
-
210
-
211
-
212
-
213
-
214
-
215
-
216
-
217
-
218
-
219
-
220
-
221
-
222
-
223
-
224
-
225
-
226
-
227
-
228
-
229
-
230
-
231
-
232
-
233
-
234
-
235
-
236
-
237
-
238
-
239
-
240
-
241
-
242
-
243
-
244
-
245
-
246
-
247
-
248
-
249
-
250
-
251
-
252
-
253
-
254
-
255
-
256
-
257
-
258
-
259
-
260
-
261
-
262
-
263
-
264
-
265
-
266
-
267
-
268
-
269
-
270
-
271
-
272
-
273
-
274
-
275
-
276
-
277
-
278
-
279
-
280
-
281
-
282
-
283
-
284
-
285
-
286
-
287
-
288
-
289
-
290
-
291
-
292
-
293
-
294
-
295
-
296
-
297
-
298
-
299
-
300
-
301
-
302
-
303
-
304
-
305
-
306
-
307
-
308
-
309
-
310
-
311
-
312
-
313
-
314
-
315
-
316
-
317
-
318
-
319
-
320
-
321
-
322
-
323
-
324
-
325
-
326
-
327
-
328
-
329
-
330
-
331
-
332
-
333
-
334
-
335
-
336
-
337
-
338
-
339
-
340
-
341
-
342
-
343
-
344
-
345
-
346
-
347
-
348
-
349
-
350
-
351
-
352
-
353
-
354
-
355
-
356
-
357
-
358
-
359
-
360
-
361
-
362
-
363
-
364
-
365
-
366
-
367
-
368
-
369
-
370
-
371
-
372
-
373
-
374
-
375
-
376
-
377
-
378
-
379
-
380
-
381
-
382
-
383
-
384
-
385
-
386
-
387
-
388
-
389
-
390
-
391
-
392
-
393
-
394
-
395
-
396
-
397
-
398
-
399
-
400
-
401
-
402
-
403
-
404
-
405
-
406
-
407
-
408
-
409
-
410
 |
 |
