Cisco SR224T Administration Guide - Page 15
Management Buttons, Apply, Close, Cancel, Clear All, Interfaces, Counters, Clear Interface, Clear Logs
 |
View all Cisco SR224T manuals
Add to My Manuals
Save this manual to your list of manuals |
Page 15 highlights
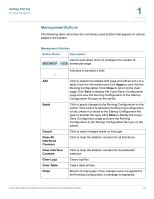
Getting Started Window Navigation 1 Management Buttons The following table describes the commonly-used buttons that appear on various pages in the system. Management Buttons Button Name Description Use the pull-down menu to configure the number of entries per page. Indicates a mandatory field. Add Apply Cancel Clear All Interfaces Counters Clear Interface Counters Clear Logs Clear Table Close Click to display the related Add page and add an entry to a table. Enter the information and click Apply to save it to the Running Configuration. Click Close to return to the main page. Click Save to display the Copy/Save Configuration page and save the Running Configuration to the Startup Configuration file type on the switch. Click to apply changes to the Running Configuration on the switch. If the switch is rebooted, the Running Configuration is lost, unless it is saved to the Startup Configuration file type or another file type. Click Save to display the Copy/ Save Configuration page and save the Running Configuration to the Startup Configuration file type on the switch. Click to reset changes made on the page. Click to clear the statistic counters for all interfaces. Click to clear the statistic counters for the selected interface. Clears log files. Clears table entries. Returns to main page. If any changes were not applied to the Running Configuration, a message is displayed. Cisco Small Business 200 Series Smart Switch Administration Guide 15
-
 1
1 -
2
-
3
-
4
-
5
-
6
-
7
-
8
-
9
-
 10
10 -
 11
11 -
 12
12 -
 13
13 -
 14
14 -
 15
15 -
 16
16 -
 17
17 -
 18
18 -
 19
19 -
 20
20 -
21
-
22
-
23
-
24
-
25
-
26
-
27
-
28
-
29
-
30
-
31
-
32
-
33
-
34
-
35
-
36
-
37
-
38
-
39
-
40
-
41
-
42
-
43
-
44
-
45
-
46
-
47
-
48
-
49
-
50
-
51
-
52
-
53
-
54
-
55
-
56
-
57
-
58
-
59
-
60
-
61
-
62
-
63
-
64
-
65
-
66
-
67
-
68
-
69
-
70
-
71
-
72
-
73
-
74
-
75
-
76
-
77
-
78
-
79
-
80
-
81
-
82
-
83
-
84
-
85
-
86
-
87
-
88
-
89
-
90
-
91
-
92
-
93
-
94
-
95
-
96
-
97
-
98
-
99
-
100
-
101
-
102
-
103
-
104
-
105
-
106
-
107
-
108
-
109
-
110
-
111
-
112
-
113
-
114
-
115
-
116
-
117
-
118
-
119
-
120
-
121
-
122
-
123
-
124
-
125
-
126
-
127
-
128
-
129
-
130
-
131
-
132
-
133
-
134
-
135
-
136
-
137
-
138
-
139
-
140
-
141
-
142
-
143
-
144
-
145
-
146
-
147
-
148
-
149
-
150
-
151
-
152
-
153
-
154
-
155
-
156
-
157
-
158
-
159
-
160
-
161
-
162
-
163
-
164
-
165
-
166
-
167
-
168
-
169
-
170
-
171
-
172
-
173
-
174
-
175
-
176
-
177
-
178
-
179
-
180
-
181
-
182
-
183
-
184
-
185
-
186
-
187
-
188
-
189
-
190
-
191
-
192
-
193
-
194
-
195
-
196
-
197
-
198
-
199
-
200
-
201
-
202
-
203
-
204
-
205
-
206
-
207
-
208
-
209
-
210
-
211
-
212
-
213
-
214
-
215
-
216
-
217
-
218
-
219
-
220
-
221
-
222
-
223
-
224
-
225
-
226
-
227
-
228
-
229
-
230
-
231
-
232
-
233
-
234
-
235
-
236
-
237
-
238
-
239
-
240
-
241
-
242
-
243
-
244
-
245
-
246
-
247
-
248
-
249
-
250
-
251
-
252
-
253
-
254
-
255
-
256
-
257
-
258
-
259
-
260
-
261
-
262
-
263
-
264
-
265
-
266
-
267
-
268
-
269
-
270
-
271
-
272
-
273
-
274
-
275
-
276
-
277
-
278
-
279
-
280
-
281
-
282
-
283
 |
 |
