Cisco SR224T Administration Guide - Page 39
DHCP Auto Configuration, Administration, File Management, Copy/Save Configuration, Source File Name
 |
View all Cisco SR224T manuals
Add to My Manuals
Save this manual to your list of manuals |
Page 39 highlights
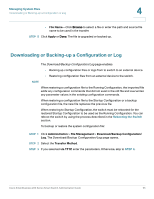
Managing System Files DHCP Auto Configuration 4 To copy one type of configuration file to another type of configuration file: STEP 1 Click Administration > File Management > Copy/Save Configuration. The Copy/ Save Configuration page opens. STEP 2 Select the Source File Name to be copied. Only valid file types are displayed (described in the Files and File Types section). STEP 3 Select the Destination File Name to be overwritten by the source file. • If you are backing up a configuration file, select one of the following formats for the backup file. - Exclude-Sensitive data is not included in the backup file. - Encrypted-Sensitive data is included in the backup file in encrypted form. - Plaintext-Sensitive data is included in the backup file in plain text. NOTE The available sensitive data options are determined by the current user SSD rules. For details, refer to Secure Sensitive Data Management > SSD Rules page. STEP 4 The Save Icon Blinking field indicates whether an icon blinks when there is unsaved data. To disable/enable this feature, click Disable/Enable Save Icon Blinking. STEP 5 Click Apply. The file is copied. DHCP Auto Configuration The switch supports DHCP auto configuration, which provides a means of passing configuration information (including the IP address of a TFTP server and a file name) to hosts on a TCP/IP network. Based on this protocol, the Auto Configuration feature enables a switch to download configuration files from a TFTP server. By default, the switch is enabled as a DHCP client when the Auto Configuration feature is enabled. Cisco Small Business 200 Series Smart Switch Administration Guide 40
-
 1
1 -
2
-
3
-
4
-
5
-
6
-
7
-
8
-
9
-
10
-
11
-
12
-
13
-
14
-
15
-
16
-
17
-
18
-
19
-
20
-
21
-
22
-
23
-
24
-
25
-
26
-
27
-
28
-
29
-
30
-
31
-
32
-
33
-
 34
34 -
 35
35 -
 36
36 -
 37
37 -
 38
38 -
 39
39 -
 40
40 -
 41
41 -
 42
42 -
 43
43 -
 44
44 -
45
-
46
-
47
-
48
-
49
-
50
-
51
-
52
-
53
-
54
-
55
-
56
-
57
-
58
-
59
-
60
-
61
-
62
-
63
-
64
-
65
-
66
-
67
-
68
-
69
-
70
-
71
-
72
-
73
-
74
-
75
-
76
-
77
-
78
-
79
-
80
-
81
-
82
-
83
-
84
-
85
-
86
-
87
-
88
-
89
-
90
-
91
-
92
-
93
-
94
-
95
-
96
-
97
-
98
-
99
-
100
-
101
-
102
-
103
-
104
-
105
-
106
-
107
-
108
-
109
-
110
-
111
-
112
-
113
-
114
-
115
-
116
-
117
-
118
-
119
-
120
-
121
-
122
-
123
-
124
-
125
-
126
-
127
-
128
-
129
-
130
-
131
-
132
-
133
-
134
-
135
-
136
-
137
-
138
-
139
-
140
-
141
-
142
-
143
-
144
-
145
-
146
-
147
-
148
-
149
-
150
-
151
-
152
-
153
-
154
-
155
-
156
-
157
-
158
-
159
-
160
-
161
-
162
-
163
-
164
-
165
-
166
-
167
-
168
-
169
-
170
-
171
-
172
-
173
-
174
-
175
-
176
-
177
-
178
-
179
-
180
-
181
-
182
-
183
-
184
-
185
-
186
-
187
-
188
-
189
-
190
-
191
-
192
-
193
-
194
-
195
-
196
-
197
-
198
-
199
-
200
-
201
-
202
-
203
-
204
-
205
-
206
-
207
-
208
-
209
-
210
-
211
-
212
-
213
-
214
-
215
-
216
-
217
-
218
-
219
-
220
-
221
-
222
-
223
-
224
-
225
-
226
-
227
-
228
-
229
-
230
-
231
-
232
-
233
-
234
-
235
-
236
-
237
-
238
-
239
-
240
-
241
-
242
-
243
-
244
-
245
-
246
-
247
-
248
-
249
-
250
-
251
-
252
-
253
-
254
-
255
-
256
-
257
-
258
-
259
-
260
-
261
-
262
-
263
-
264
-
265
-
266
-
267
-
268
-
269
-
270
-
271
-
272
-
273
-
274
-
275
-
276
-
277
-
278
-
279
-
280
-
281
-
282
-
283
 |
 |
