Cisco SR224T Administration Guide - Page 226
Setting Password Complexity Rules, User Name, Password, Confirm Password, Password Strength Meter
 |
View all Cisco SR224T manuals
Add to My Manuals
Save this manual to your list of manuals |
Page 226 highlights
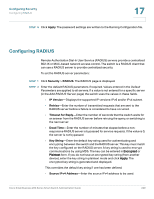
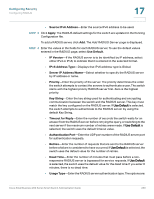
Configuring Security Defining Users 17 When password recovery mechanism is disabled, accessing the boot menu is still allowed and you can trigger the password recovery process. The difference is that in this case, all configuration and user files are removed during the system boot process, and a suitable log message is generated to the terminal. STEP 3 Click Add to add a new user or click Edit to modify a user. The Add (or Edit) a User Account page is displayed. STEP 4 Enter the parameters. • User Name-Enter a new username between 0 and 20 characters. UTF-8 characters are not permitted. • Password-Enter a password (UTF-8 characters are not permitted). If the password strength and complexity is defined, the user password must comply with the policy configured in the Setting Password Complexity Rules section. • Confirm Password-Enter the password again. • Password Strength Meter-Displays the strength of password. The policy for password strength and complexity are configured in the Password Strength page. STEP 5 Click Apply. The user is added to the Running Configuration file of the switch. Setting Password Complexity Rules Passwords are used to authenticate users accessing the switch. Simple passwords are potential security hazards. Therefore, password complexity requirements are enforced by default and may be configured as necessary. Password complexity requirements are configured on the Password Strength page reached through the Security drop-down menu. Additionally, password aging time may be configured on this page. To define password complexity rules: STEP 1 Click Security > Password Strength. The Password Strength page is displayed. STEP 2 Enter the following aging parameters for passwords: • Password Aging-If selected, the user is prompted to change the password when the Password Aging Time expires. Cisco Small Business 200 Series Smart Switch Administration Guide 227
-
 1
1 -
2
-
3
-
4
-
5
-
6
-
7
-
8
-
9
-
10
-
11
-
12
-
13
-
14
-
15
-
16
-
17
-
18
-
19
-
20
-
21
-
22
-
23
-
24
-
25
-
26
-
27
-
28
-
29
-
30
-
31
-
32
-
33
-
34
-
35
-
36
-
37
-
38
-
39
-
40
-
41
-
42
-
43
-
44
-
45
-
46
-
47
-
48
-
49
-
50
-
51
-
52
-
53
-
54
-
55
-
56
-
57
-
58
-
59
-
60
-
61
-
62
-
63
-
64
-
65
-
66
-
67
-
68
-
69
-
70
-
71
-
72
-
73
-
74
-
75
-
76
-
77
-
78
-
79
-
80
-
81
-
82
-
83
-
84
-
85
-
86
-
87
-
88
-
89
-
90
-
91
-
92
-
93
-
94
-
95
-
96
-
97
-
98
-
99
-
100
-
101
-
102
-
103
-
104
-
105
-
106
-
107
-
108
-
109
-
110
-
111
-
112
-
113
-
114
-
115
-
116
-
117
-
118
-
119
-
120
-
121
-
122
-
123
-
124
-
125
-
126
-
127
-
128
-
129
-
130
-
131
-
132
-
133
-
134
-
135
-
136
-
137
-
138
-
139
-
140
-
141
-
142
-
143
-
144
-
145
-
146
-
147
-
148
-
149
-
150
-
151
-
152
-
153
-
154
-
155
-
156
-
157
-
158
-
159
-
160
-
161
-
162
-
163
-
164
-
165
-
166
-
167
-
168
-
169
-
170
-
171
-
172
-
173
-
174
-
175
-
176
-
177
-
178
-
179
-
180
-
181
-
182
-
183
-
184
-
185
-
186
-
187
-
188
-
189
-
190
-
191
-
192
-
193
-
194
-
195
-
196
-
197
-
198
-
199
-
200
-
201
-
202
-
203
-
204
-
205
-
206
-
207
-
208
-
209
-
210
-
211
-
212
-
213
-
214
-
215
-
216
-
217
-
218
-
219
-
220
-
 221
221 -
 222
222 -
 223
223 -
 224
224 -
 225
225 -
 226
226 -
 227
227 -
 228
228 -
 229
229 -
 230
230 -
 231
231 -
232
-
233
-
234
-
235
-
236
-
237
-
238
-
239
-
240
-
241
-
242
-
243
-
244
-
245
-
246
-
247
-
248
-
249
-
250
-
251
-
252
-
253
-
254
-
255
-
256
-
257
-
258
-
259
-
260
-
261
-
262
-
263
-
264
-
265
-
266
-
267
-
268
-
269
-
270
-
271
-
272
-
273
-
274
-
275
-
276
-
277
-
278
-
279
-
280
-
281
-
282
-
283
 |
 |
