Dell PowerEdge 4300 Dell PowerEdge 4300 Systems Installation and Troubleshooti - Page 195
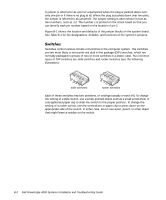
See Removing the Computer Cover in for instructions.
 |
View all Dell PowerEdge 4300 manuals
Add to My Manuals
Save this manual to your list of manuals |
Page 195 highlights
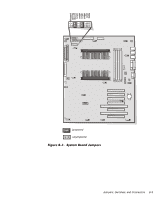
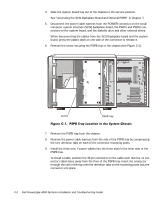
The computer's software security features include a system password and a setup password, which are discussed in detail in Chapter 4, "Using the System Setup Program," of the Dell PowerEdge 4300 Systems User's Guide. A password jumper on the system board enables or disables the password features and clears any password(s) currently in use. To disable a forgotten system or setup password, perform the following steps. 1. Remove the computer cover. See "Removing the Computer Cover" in Chapter 7 for instructions. 2. Refer to "Jumpers and Switches-A General Explanation" found earlier in this appendix for jumper information. Figure B-1 shows the location of the password jumper (labeled "PASSWD") on the system board. 3. Remove the jumper plug from the PASSWD jumper. 4. Replace the computer cover, and then reconnect the computer to an electrical outlet and turn it on. The existing passwords are not disabled (erased) until the system boots with the PASSWD jumper plug removed. However, before you assign a new system and/ or user password, you must install the jumper plug. NOTE: If you assign a new system and/or setup password with the jumper plug still removed, the system disables the new password(s) the next time it boots. 5. Repeat step 1. 6. Install the jumper plug on the PASSWD jumper. 7. Replace the computer cover, and then reconnect the computer and peripherals to electrical outlets and turn them on. 8. Assign a new system or setup password. To assign a new system password using the System Setup program, see "Assigning a System Password" in Chapter 4 of the User's Guide. To assign a new setup password using the System Setup program, see "Assigning a Setup Password" in Chapter 4 of the User's Guide. Jumpers, Switches, and Connectors B-5
-
 1
1 -
2
-
3
-
4
-
5
-
6
-
7
-
8
-
9
-
10
-
11
-
12
-
13
-
14
-
15
-
16
-
17
-
18
-
19
-
20
-
21
-
22
-
23
-
24
-
25
-
26
-
27
-
28
-
29
-
30
-
31
-
32
-
33
-
34
-
35
-
36
-
37
-
38
-
39
-
40
-
41
-
42
-
43
-
44
-
45
-
46
-
47
-
48
-
49
-
50
-
51
-
52
-
53
-
54
-
55
-
56
-
57
-
58
-
59
-
60
-
61
-
62
-
63
-
64
-
65
-
66
-
67
-
68
-
69
-
70
-
71
-
72
-
73
-
74
-
75
-
76
-
77
-
78
-
79
-
80
-
81
-
82
-
83
-
84
-
85
-
86
-
87
-
88
-
89
-
90
-
91
-
92
-
93
-
94
-
95
-
96
-
97
-
98
-
99
-
100
-
101
-
102
-
103
-
104
-
105
-
106
-
107
-
108
-
109
-
110
-
111
-
112
-
113
-
114
-
115
-
116
-
117
-
118
-
119
-
120
-
121
-
122
-
123
-
124
-
125
-
126
-
127
-
128
-
129
-
130
-
131
-
132
-
133
-
134
-
135
-
136
-
137
-
138
-
139
-
140
-
141
-
142
-
143
-
144
-
145
-
146
-
147
-
148
-
149
-
150
-
151
-
152
-
153
-
154
-
155
-
156
-
157
-
158
-
159
-
160
-
161
-
162
-
163
-
164
-
165
-
166
-
167
-
168
-
169
-
170
-
171
-
172
-
173
-
174
-
175
-
176
-
177
-
178
-
179
-
180
-
181
-
182
-
183
-
184
-
185
-
186
-
187
-
188
-
189
-
 190
190 -
 191
191 -
 192
192 -
 193
193 -
 194
194 -
 195
195 -
 196
196 -
 197
197 -
 198
198 -
 199
199 -
 200
200 -
201
-
202
-
203
-
204
-
205
-
206
-
207
-
208
-
209
-
210
-
211
-
212
-
213
-
214
-
215
-
216
-
217
 |
 |
