Dell PowerEdge 4300 Dell PowerEdge 4300 Systems Installation and Troubleshooti - Page 203
Upgrading the Computer With Additional Power Supplies
 |
View all Dell PowerEdge 4300 manuals
Add to My Manuals
Save this manual to your list of manuals |
Page 203 highlights
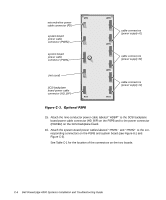
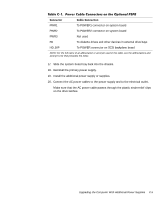
PWR1 To POWER1 connector on system board PWR2 To POWER2 connector on system board PWR3 Not used FD To diskette drives and other devices in external drive bays HD_B/P To POWER connector on SCSI backplane board NOTE: For the full name of an abbreviation or acronym used in this table, see the abbreviations and acronyms list that precedes the Index. 17. Slide the system board tray back into the chassis. 18. Reinstall the primary power supply. 19. Install the additional power supply or supplies. 20. Connect the AC power cables to the power supply and to the electrical outlet. Make sure that the AC power cable passes through the plastic strain-relief clips on the drive latches. Upgrading the Computer With Additional Power Supplies C-5
-
 1
1 -
2
-
3
-
4
-
5
-
6
-
7
-
8
-
9
-
10
-
11
-
12
-
13
-
14
-
15
-
16
-
17
-
18
-
19
-
20
-
21
-
22
-
23
-
24
-
25
-
26
-
27
-
28
-
29
-
30
-
31
-
32
-
33
-
34
-
35
-
36
-
37
-
38
-
39
-
40
-
41
-
42
-
43
-
44
-
45
-
46
-
47
-
48
-
49
-
50
-
51
-
52
-
53
-
54
-
55
-
56
-
57
-
58
-
59
-
60
-
61
-
62
-
63
-
64
-
65
-
66
-
67
-
68
-
69
-
70
-
71
-
72
-
73
-
74
-
75
-
76
-
77
-
78
-
79
-
80
-
81
-
82
-
83
-
84
-
85
-
86
-
87
-
88
-
89
-
90
-
91
-
92
-
93
-
94
-
95
-
96
-
97
-
98
-
99
-
100
-
101
-
102
-
103
-
104
-
105
-
106
-
107
-
108
-
109
-
110
-
111
-
112
-
113
-
114
-
115
-
116
-
117
-
118
-
119
-
120
-
121
-
122
-
123
-
124
-
125
-
126
-
127
-
128
-
129
-
130
-
131
-
132
-
133
-
134
-
135
-
136
-
137
-
138
-
139
-
140
-
141
-
142
-
143
-
144
-
145
-
146
-
147
-
148
-
149
-
150
-
151
-
152
-
153
-
154
-
155
-
156
-
157
-
158
-
159
-
160
-
161
-
162
-
163
-
164
-
165
-
166
-
167
-
168
-
169
-
170
-
171
-
172
-
173
-
174
-
175
-
176
-
177
-
178
-
179
-
180
-
181
-
182
-
183
-
184
-
185
-
186
-
187
-
188
-
189
-
190
-
191
-
192
-
193
-
194
-
195
-
196
-
197
-
 198
198 -
 199
199 -
 200
200 -
 201
201 -
 202
202 -
 203
203 -
 204
204 -
 205
205 -
 206
206 -
 207
207 -
 208
208 -
209
-
210
-
211
-
212
-
213
-
214
-
215
-
216
-
217
 |
 |

Upgrading the Computer With Additional Power Supplies
C-5
±
17.
Slide the system board tray back into the chassis.
18.
Reinstall the primary power supply.
19.
Install the additional power supply or supplies.
20.
Connect the AC power cables to the power supply and to the electrical outlet.
Make sure that the AC power cable passes through the plastic strain-relief clips
on the drive latches.
7DEOH±&¶´µ±±3RZHU±&DEOH±&RQQHFWRUV±RQ±WKH±2SWLRQDO±363%
&RQQHFWRU
&DEOH²&RQQHFWLRQ
PWR1
To POWER1 connector on system board
PWR2
To POWER2 connector on system board
PWR3
Not used
FD
To diskette drives and other devices in external drive bays
HD_B/P
To POWER connector on SCSI backplane board
NOTE: For the full name of an abbreviation or acronym used in this table, see the abbreviations and
acronyms list that precedes the Index.