Dell PowerEdge 4300 Dell PowerEdge 4300 Systems Installation and Troubleshooti - Page 40
Run the System Set Test Group in the Dell
 |
View all Dell PowerEdge 4300 manuals
Add to My Manuals
Save this manual to your list of manuals |
Page 40 highlights
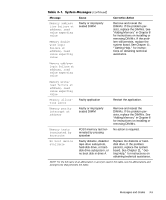
1-3-2 1-3-3 1-3-4 No memory installed Chip or data line failure in the first 64 KB of main memory Odd/even logic failure in the first 64 KB of main memory Remove and reseat the DIMMs. If the problem persists, replace the DIMMs. See "Adding Memory" in Chapter 8 for instructions on installing or removing DIMMs. If the problem still persists, replace the system board. See Chapter 11, "Getting Help," for instructions on obtaining technical assistance. 1-4-1 Address line failure in the first 64 KB of main memory 1-4-2 Parity failure in the first 64 KB of main memory 2-1-1 Bit failure in the first through 64 KB of main memory 2-4-4 3-1-1 Slave DMA-register failure 3-1-2 Master DMA-register failure Replace the system board. See Chapter 11, "Getting Help," for instructions on obtaining technical assistance. 3-1-3 Master interrupt-mask register failure 3-1-4 Slave interrupt-mask register failure 3-2-4 Keyboard-controller test failure Check the keyboard cable and connector for proper connection. If the problem persists, run the Keyboard Test Group in the Dell Diagnostics to determine whether the keyboard or keyboard controller is faulty. See Chapter 5, "Running the Dell Diagnostics."If the keyboard controller is faulty, replace the system board. See Chapter 11, "Getting Help," for instructions on obtaining technical assistance. 3-3-1 CMOS failure Run the System Set Test Group in the Dell Diagnostics to isolate the problem. See Chapter 5, "Running the Dell Diagnostics." NOTE: For the full name of an abbreviation or acronym used in this table, see the abbreviations and acronyms list that precedes the Index. 3-10 Dell PowerEdge 4300 Systems Installation and Troubleshooting Guide
-
 1
1 -
2
-
3
-
4
-
5
-
6
-
7
-
8
-
9
-
10
-
11
-
12
-
13
-
14
-
15
-
16
-
17
-
18
-
19
-
20
-
21
-
22
-
23
-
24
-
25
-
26
-
27
-
28
-
29
-
30
-
31
-
32
-
33
-
34
-
 35
35 -
 36
36 -
 37
37 -
 38
38 -
 39
39 -
 40
40 -
 41
41 -
 42
42 -
 43
43 -
 44
44 -
 45
45 -
46
-
47
-
48
-
49
-
50
-
51
-
52
-
53
-
54
-
55
-
56
-
57
-
58
-
59
-
60
-
61
-
62
-
63
-
64
-
65
-
66
-
67
-
68
-
69
-
70
-
71
-
72
-
73
-
74
-
75
-
76
-
77
-
78
-
79
-
80
-
81
-
82
-
83
-
84
-
85
-
86
-
87
-
88
-
89
-
90
-
91
-
92
-
93
-
94
-
95
-
96
-
97
-
98
-
99
-
100
-
101
-
102
-
103
-
104
-
105
-
106
-
107
-
108
-
109
-
110
-
111
-
112
-
113
-
114
-
115
-
116
-
117
-
118
-
119
-
120
-
121
-
122
-
123
-
124
-
125
-
126
-
127
-
128
-
129
-
130
-
131
-
132
-
133
-
134
-
135
-
136
-
137
-
138
-
139
-
140
-
141
-
142
-
143
-
144
-
145
-
146
-
147
-
148
-
149
-
150
-
151
-
152
-
153
-
154
-
155
-
156
-
157
-
158
-
159
-
160
-
161
-
162
-
163
-
164
-
165
-
166
-
167
-
168
-
169
-
170
-
171
-
172
-
173
-
174
-
175
-
176
-
177
-
178
-
179
-
180
-
181
-
182
-
183
-
184
-
185
-
186
-
187
-
188
-
189
-
190
-
191
-
192
-
193
-
194
-
195
-
196
-
197
-
198
-
199
-
200
-
201
-
202
-
203
-
204
-
205
-
206
-
207
-
208
-
209
-
210
-
211
-
212
-
213
-
214
-
215
-
216
-
217
 |
 |
