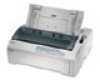
Epson FX-880 User Manual - Page 159
The cut-sheet feeder automatically loads paper when the printer receives, Position
 |
View all Epson FX-880 manuals
Add to My Manuals
Save this manual to your list of manuals |
Page 159 highlights
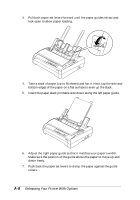
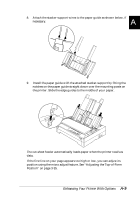
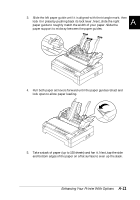
6. Insert the paper stack printable side down along the left paper guide. 7. Adjust the right paper guide so that it matches your paper's width and lock it in place. Make sure the position of the guide allows the paper to move up and down freely. If you are loading envelopes, push back the envelope levers as shown below. 8. Push back the paper set levers to clamp the paper or envelopes against the guide rollers. The cut-sheet feeder automatically loads paper when the printer receives data. If the first line on your page appears too high or low, you can adjust its position using the micro adjust feature. See "Adjusting the Top-of-Form Position" on page 3-35. A-12 Enhancing Your Printer With Options
-
 1
1 -
2
-
3
-
4
-
5
-
6
-
7
-
8
-
9
-
10
-
11
-
12
-
13
-
14
-
15
-
16
-
17
-
18
-
19
-
20
-
21
-
22
-
23
-
24
-
25
-
26
-
27
-
28
-
29
-
30
-
31
-
32
-
33
-
34
-
35
-
36
-
37
-
38
-
39
-
40
-
41
-
42
-
43
-
44
-
45
-
46
-
47
-
48
-
49
-
50
-
51
-
52
-
53
-
54
-
55
-
56
-
57
-
58
-
59
-
60
-
61
-
62
-
63
-
64
-
65
-
66
-
67
-
68
-
69
-
70
-
71
-
72
-
73
-
74
-
75
-
76
-
77
-
78
-
79
-
80
-
81
-
82
-
83
-
84
-
85
-
86
-
87
-
88
-
89
-
90
-
91
-
92
-
93
-
94
-
95
-
96
-
97
-
98
-
99
-
100
-
101
-
102
-
103
-
104
-
105
-
106
-
107
-
108
-
109
-
110
-
111
-
112
-
113
-
114
-
115
-
116
-
117
-
118
-
119
-
120
-
121
-
122
-
123
-
124
-
125
-
126
-
127
-
128
-
129
-
130
-
131
-
132
-
133
-
134
-
135
-
136
-
137
-
138
-
139
-
140
-
141
-
142
-
143
-
144
-
145
-
146
-
147
-
148
-
149
-
150
-
151
-
152
-
153
-
 154
154 -
 155
155 -
 156
156 -
 157
157 -
 158
158 -
 159
159 -
 160
160 -
 161
161 -
 162
162 -
 163
163 -
 164
164 -
165
-
166
-
167
-
168
-
169
-
170
-
171
-
172
-
173
-
174
-
175
-
176
-
177
-
178
-
179
-
180
-
181
-
182
-
183
-
184
-
185
-
186
-
187
-
188
-
189
-
190
-
191
-
192
-
193
-
194
-
195
-
196
-
197
-
198
-
199
-
200
-
201
-
202
-
203
-
204
-
205
-
206
-
207
-
208
-
209
-
210
-
211
-
212
-
213
-
214
-
215
-
216
-
217
-
218
-
219
-
220
-
221
 |
 |
6.
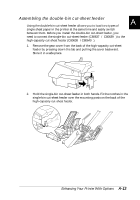
Insert the paper stack printable side down along the left paper guide.
7.
Adjust the right paper guide so that it matches your paper’s width and
lock it in place. Make sure the position of the guide allows the paper
to move up and down freely.
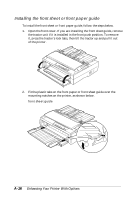
If you are loading envelopes, push back the envelope levers as shown
below.
8.
Push back the paper set levers to clamp the paper or envelopes against
the guide rollers.
The cut-sheet feeder automatically loads paper when the printer receives
data.
If the first line on your page appears too high or low, you can adjust its
position using the micro adjust feature. See “Adjusting the Top-of-Form
Position” on page 3-35.
A-12
Enhancing Your Printer With Options