Epson FX-880 User Manual - Page 91
Using two tractors in a push/pull combination, for FX-880, C80021
 |
View all Epson FX-880 manuals
Add to My Manuals
Save this manual to your list of manuals |
Page 91 highlights
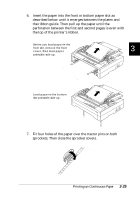
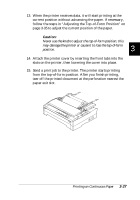
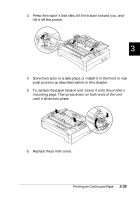
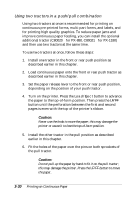
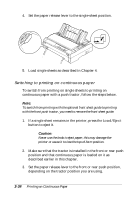
Using two tractors in a push/pull combination Using two tractors at once is recommended for printing on continuous pre-printed forms, multi-part forms, and labels, and for printing high quality graphics. To reduce paper jams and improve continuous paper feeding, you can install the optional additional tractor (C80020] for FX-880, C80021] for FX-1180) and then use two tractors at the same time. To use two tractors at once, follow these steps: 1. Install one tractor in the front or rear push position as described earlier in this chapter. 2. Load continuous paper onto the front or rear push tractor as described earlier in this chapter. 3. Set the paper release lever to the front or rear push position, depending on the position of your push tractor. 4. Turn on the printer. Press the Load/Eject button to advance the paper to the top-of-form position. Then press the LF/FF button until the perforation between the first and second pages is even with the top of the printer's ribbon. c Caution: Never use the knob to move the paper; this may damage the printer or cause it to lose the top-of-form position. 5. Install the other tractor in the pull position as described earlier in this chapter. 6. Fit the holes of the paper over the pins on both sprockets of the pull tractor. c Caution: Do not pull up the paper by hand to fit it on the pull tractor; this may damage the printer. Press the LF/FF button to move the paper. 3-30 Printing on Continuous Paper
-
 1
1 -
2
-
3
-
4
-
5
-
6
-
7
-
8
-
9
-
10
-
11
-
12
-
13
-
14
-
15
-
16
-
17
-
18
-
19
-
20
-
21
-
22
-
23
-
24
-
25
-
26
-
27
-
28
-
29
-
30
-
31
-
32
-
33
-
34
-
35
-
36
-
37
-
38
-
39
-
40
-
41
-
42
-
43
-
44
-
45
-
46
-
47
-
48
-
49
-
50
-
51
-
52
-
53
-
54
-
55
-
56
-
57
-
58
-
59
-
60
-
61
-
62
-
63
-
64
-
65
-
66
-
67
-
68
-
69
-
70
-
71
-
72
-
73
-
74
-
75
-
76
-
77
-
78
-
79
-
80
-
81
-
82
-
83
-
84
-
85
-
 86
86 -
 87
87 -
 88
88 -
 89
89 -
 90
90 -
 91
91 -
 92
92 -
 93
93 -
 94
94 -
 95
95 -
 96
96 -
97
-
98
-
99
-
100
-
101
-
102
-
103
-
104
-
105
-
106
-
107
-
108
-
109
-
110
-
111
-
112
-
113
-
114
-
115
-
116
-
117
-
118
-
119
-
120
-
121
-
122
-
123
-
124
-
125
-
126
-
127
-
128
-
129
-
130
-
131
-
132
-
133
-
134
-
135
-
136
-
137
-
138
-
139
-
140
-
141
-
142
-
143
-
144
-
145
-
146
-
147
-
148
-
149
-
150
-
151
-
152
-
153
-
154
-
155
-
156
-
157
-
158
-
159
-
160
-
161
-
162
-
163
-
164
-
165
-
166
-
167
-
168
-
169
-
170
-
171
-
172
-
173
-
174
-
175
-
176
-
177
-
178
-
179
-
180
-
181
-
182
-
183
-
184
-
185
-
186
-
187
-
188
-
189
-
190
-
191
-
192
-
193
-
194
-
195
-
196
-
197
-
198
-
199
-
200
-
201
-
202
-
203
-
204
-
205
-
206
-
207
-
208
-
209
-
210
-
211
-
212
-
213
-
214
-
215
-
216
-
217
-
218
-
219
-
220
-
221
 |
 |