Epson FX-880 User Manual - Page 81
Using the Tractor in the Pull Position
 |
View all Epson FX-880 manuals
Add to My Manuals
Save this manual to your list of manuals |
Page 81 highlights
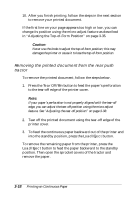
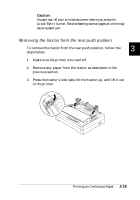
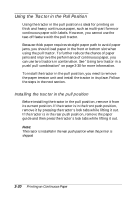
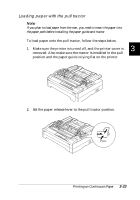
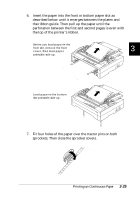
Using the Tractor in the Pull Position Using the tractor in the pull position is ideal for printing on thick and heavy continuous paper, such as multi-part forms or continuous paper with labels. However, you cannot use the tear-off feature with the pull tractor. Because thick paper requires straight paper path to avoid paper jams, you should load paper in the front or bottom slot when using the pull tractor. To further reduce the chance of paper jams and improve the performance of continuous paper, you can use two tractors in combination. See "Using two tractor in a push/pull combination" on page 3-30 for more information. To install the tractor in the pull position, you need to remove the paper tension unit and install the tractor in its place. Follow the steps in the next section. Installing the tractor in the pull position Before installing the tractor in the pull position, remove it from its current position. If the tractor is in the front push position, remove it by pressing the tractor's lock tabs while lifting it out. If the tractor is in the rear push position, remove the paper guide and then press the tractor's lock tabs while lifting it out. Note: The tractor is installed in the rear push position when the printer is shipped. 3-20 Printing on Continuous Paper
-
 1
1 -
2
-
3
-
4
-
5
-
6
-
7
-
8
-
9
-
10
-
11
-
12
-
13
-
14
-
15
-
16
-
17
-
18
-
19
-
20
-
21
-
22
-
23
-
24
-
25
-
26
-
27
-
28
-
29
-
30
-
31
-
32
-
33
-
34
-
35
-
36
-
37
-
38
-
39
-
40
-
41
-
42
-
43
-
44
-
45
-
46
-
47
-
48
-
49
-
50
-
51
-
52
-
53
-
54
-
55
-
56
-
57
-
58
-
59
-
60
-
61
-
62
-
63
-
64
-
65
-
66
-
67
-
68
-
69
-
70
-
71
-
72
-
73
-
74
-
75
-
 76
76 -
 77
77 -
 78
78 -
 79
79 -
 80
80 -
 81
81 -
 82
82 -
 83
83 -
 84
84 -
 85
85 -
 86
86 -
87
-
88
-
89
-
90
-
91
-
92
-
93
-
94
-
95
-
96
-
97
-
98
-
99
-
100
-
101
-
102
-
103
-
104
-
105
-
106
-
107
-
108
-
109
-
110
-
111
-
112
-
113
-
114
-
115
-
116
-
117
-
118
-
119
-
120
-
121
-
122
-
123
-
124
-
125
-
126
-
127
-
128
-
129
-
130
-
131
-
132
-
133
-
134
-
135
-
136
-
137
-
138
-
139
-
140
-
141
-
142
-
143
-
144
-
145
-
146
-
147
-
148
-
149
-
150
-
151
-
152
-
153
-
154
-
155
-
156
-
157
-
158
-
159
-
160
-
161
-
162
-
163
-
164
-
165
-
166
-
167
-
168
-
169
-
170
-
171
-
172
-
173
-
174
-
175
-
176
-
177
-
178
-
179
-
180
-
181
-
182
-
183
-
184
-
185
-
186
-
187
-
188
-
189
-
190
-
191
-
192
-
193
-
194
-
195
-
196
-
197
-
198
-
199
-
200
-
201
-
202
-
203
-
204
-
205
-
206
-
207
-
208
-
209
-
210
-
211
-
212
-
213
-
214
-
215
-
216
-
217
-
218
-
219
-
220
-
221
 |
 |