Epson FX-880 User Manual - Page 94
Switching Between Printing on Continuous Paper and Single Sheets
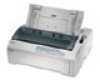 |
View all Epson FX-880 manuals
Add to My Manuals
Save this manual to your list of manuals |
Page 94 highlights
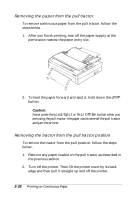
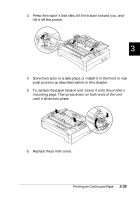
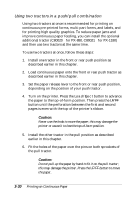
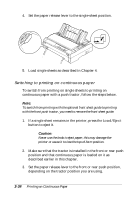
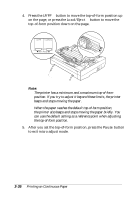
Switching Between Printing on Continuous Paper and Single Sheets You can easily switch back and forth between printing on continuous paper with a push tractor and printing on single sheets without having to remove or reload the continuous paper. 3 Removing the tractor from the pull tractor position Note: o If continuous labels are loaded in the printer, remove them before switching to single sheets. See "Removing continuous paper with labels" on page 3-5. o If the tractor is in the pull position, remove any continuous paper from it before switching to single-sheet printing. See "Removing the paper from the pull tractor" on page 3-27. To switch from printing on continuous paper from a push tractor to printing on single sheets, follow the steps below. 1. If any printed pages remain in the printer, press the Tear Off/Bin button to advance the paper to the tear-off position. Then tear off the printed pages. c Caution: Make sure you tear off your printed document before you press the Load/Eject button in the next step. Reverse feeding several pages at a time may cause a paper jam. 2. Press the Load/Eject button to feed the continuous paper backward to the standby position. The paper is still attached to the push tractor but is no longer in the paper path. 3. Lower the continuous paper support on the paper guide until it clicks into place, then move the paper guide to the upright position. Printing on Continuous Paper 3-33
-
 1
1 -
2
-
3
-
4
-
5
-
6
-
7
-
8
-
9
-
10
-
11
-
12
-
13
-
14
-
15
-
16
-
17
-
18
-
19
-
20
-
21
-
22
-
23
-
24
-
25
-
26
-
27
-
28
-
29
-
30
-
31
-
32
-
33
-
34
-
35
-
36
-
37
-
38
-
39
-
40
-
41
-
42
-
43
-
44
-
45
-
46
-
47
-
48
-
49
-
50
-
51
-
52
-
53
-
54
-
55
-
56
-
57
-
58
-
59
-
60
-
61
-
62
-
63
-
64
-
65
-
66
-
67
-
68
-
69
-
70
-
71
-
72
-
73
-
74
-
75
-
76
-
77
-
78
-
79
-
80
-
81
-
82
-
83
-
84
-
85
-
86
-
87
-
88
-
 89
89 -
 90
90 -
 91
91 -
 92
92 -
 93
93 -
 94
94 -
 95
95 -
 96
96 -
 97
97 -
 98
98 -
 99
99 -
100
-
101
-
102
-
103
-
104
-
105
-
106
-
107
-
108
-
109
-
110
-
111
-
112
-
113
-
114
-
115
-
116
-
117
-
118
-
119
-
120
-
121
-
122
-
123
-
124
-
125
-
126
-
127
-
128
-
129
-
130
-
131
-
132
-
133
-
134
-
135
-
136
-
137
-
138
-
139
-
140
-
141
-
142
-
143
-
144
-
145
-
146
-
147
-
148
-
149
-
150
-
151
-
152
-
153
-
154
-
155
-
156
-
157
-
158
-
159
-
160
-
161
-
162
-
163
-
164
-
165
-
166
-
167
-
168
-
169
-
170
-
171
-
172
-
173
-
174
-
175
-
176
-
177
-
178
-
179
-
180
-
181
-
182
-
183
-
184
-
185
-
186
-
187
-
188
-
189
-
190
-
191
-
192
-
193
-
194
-
195
-
196
-
197
-
198
-
199
-
200
-
201
-
202
-
203
-
204
-
205
-
206
-
207
-
208
-
209
-
210
-
211
-
212
-
213
-
214
-
215
-
216
-
217
-
218
-
219
-
220
-
221
 |
 |
