Epson FX-880 User Manual - Page 70
of your paper, but do not lock it. Move the center support, midway between the two sprocket units.
 |
View all Epson FX-880 manuals
Add to My Manuals
Save this manual to your list of manuals |
Page 70 highlights
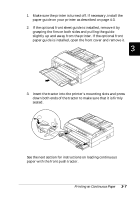
4. Release the left and right sprockets by pushing the blue sprocket lock levers backward. 3 5. Slide the left sprocket approximately 12 mm (0.5 inch) from the far left position and pull the blue lever forward to lock it in place. Then slide the right sprocket to match the width of your paper, but do not lock it. Move the center support midway between the two sprocket units. 12 mm (0.5 inch) The triangle mark on the inside of the front cover indicates the point furthest to the left where printing can begin. 10 5 0 Printing on Continuous Paper 3-9
-
 1
1 -
2
-
3
-
4
-
5
-
6
-
7
-
8
-
9
-
10
-
11
-
12
-
13
-
14
-
15
-
16
-
17
-
18
-
19
-
20
-
21
-
22
-
23
-
24
-
25
-
26
-
27
-
28
-
29
-
30
-
31
-
32
-
33
-
34
-
35
-
36
-
37
-
38
-
39
-
40
-
41
-
42
-
43
-
44
-
45
-
46
-
47
-
48
-
49
-
50
-
51
-
52
-
53
-
54
-
55
-
56
-
57
-
58
-
59
-
60
-
61
-
62
-
63
-
64
-
 65
65 -
 66
66 -
 67
67 -
 68
68 -
 69
69 -
 70
70 -
 71
71 -
 72
72 -
 73
73 -
 74
74 -
 75
75 -
76
-
77
-
78
-
79
-
80
-
81
-
82
-
83
-
84
-
85
-
86
-
87
-
88
-
89
-
90
-
91
-
92
-
93
-
94
-
95
-
96
-
97
-
98
-
99
-
100
-
101
-
102
-
103
-
104
-
105
-
106
-
107
-
108
-
109
-
110
-
111
-
112
-
113
-
114
-
115
-
116
-
117
-
118
-
119
-
120
-
121
-
122
-
123
-
124
-
125
-
126
-
127
-
128
-
129
-
130
-
131
-
132
-
133
-
134
-
135
-
136
-
137
-
138
-
139
-
140
-
141
-
142
-
143
-
144
-
145
-
146
-
147
-
148
-
149
-
150
-
151
-
152
-
153
-
154
-
155
-
156
-
157
-
158
-
159
-
160
-
161
-
162
-
163
-
164
-
165
-
166
-
167
-
168
-
169
-
170
-
171
-
172
-
173
-
174
-
175
-
176
-
177
-
178
-
179
-
180
-
181
-
182
-
183
-
184
-
185
-
186
-
187
-
188
-
189
-
190
-
191
-
192
-
193
-
194
-
195
-
196
-
197
-
198
-
199
-
200
-
201
-
202
-
203
-
204
-
205
-
206
-
207
-
208
-
209
-
210
-
211
-
212
-
213
-
214
-
215
-
216
-
217
-
218
-
219
-
220
-
221
 |
 |
4.
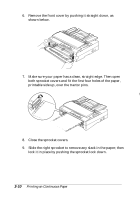
Release the left and right sprockets by pushing the blue
sprocket lock levers backward.
5.
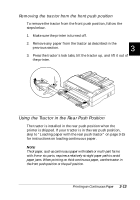
Slide the left sprocket approximately 12 mm (0.5 inch) from
the far left position and pull the blue lever forward to lock
it in place. Then slide the right sprocket to match the width
of your paper, but do not lock it. Move the center support
midway between the two sprocket units.
10
5
0
12 mm (0.5 inch)
The triangle mark on the
inside of the front cover
indicates the point
furthest to the left where
printing can begin.
3
Printing on Continuous Paper
3-9