Epson Stylus Pro 4800 Portrait Edition Printer Guide - Page 109
Replacing Ink Cartridges, is displayed
 |
View all Epson Stylus Pro 4800 Portrait Edition manuals
Add to My Manuals
Save this manual to your list of manuals |
Page 109 highlights
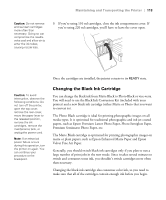
Tip: You can store partially used ink cartridges for up to 6 months. Maintaining and Transporting the Printer | 109 Replacing Ink Cartridges Before you begin a large print job, you should check your ink levels. If one of your cartridges is low, you can replace it before you start. Or you can wait until the ink runs out, replace the cartridge, and then continue the job without any loss of print quality. However, it is best to replace a low ink cartridge before starting a large print job. The easiest way to check ink levels is from the control panel: 1 2 3 4 5 6 7 8 Menu 3sec. 1 Matte Black/Photo Black Full 2 Cyan 4 Yellow 6 Light Cyan 3 Magenta 5 Light Black Empty 8 Light Light Black 7 Light Magenta When the red B ink light is flashing (and INK LOW is displayed on the LCD panel), the indicated cartridge is almost out of ink. Make sure you have a replacement cartridge. When the light stays on and INK OUT is displayed, the cartridge is empty. You must replace the cartridge before you can continue printing. You can install any combination of 110 ml and 220 ml cartridges. It's a good idea to keep a set of empty 110 ml cartridges on hand at all times in case you need to ship the printer. 5-109
-
 1
1 -
2
-
3
-
4
-
5
-
6
-
7
-
8
-
9
-
10
-
11
-
12
-
13
-
14
-
15
-
16
-
17
-
18
-
19
-
20
-
21
-
22
-
23
-
24
-
25
-
26
-
27
-
28
-
29
-
30
-
31
-
32
-
33
-
34
-
35
-
36
-
37
-
38
-
39
-
40
-
41
-
42
-
43
-
44
-
45
-
46
-
47
-
48
-
49
-
50
-
51
-
52
-
53
-
54
-
55
-
56
-
57
-
58
-
59
-
60
-
61
-
62
-
63
-
64
-
65
-
66
-
67
-
68
-
69
-
70
-
71
-
72
-
73
-
74
-
75
-
76
-
77
-
78
-
79
-
80
-
81
-
82
-
83
-
84
-
85
-
86
-
87
-
88
-
89
-
90
-
91
-
92
-
93
-
94
-
95
-
96
-
97
-
98
-
99
-
100
-
101
-
102
-
103
-
 104
104 -
 105
105 -
 106
106 -
 107
107 -
 108
108 -
 109
109 -
 110
110 -
 111
111 -
 112
112 -
 113
113 -
 114
114 -
115
-
116
-
117
-
118
-
119
-
120
-
121
-
122
-
123
-
124
-
125
-
126
-
127
-
128
-
129
-
130
-
131
-
132
-
133
-
134
-
135
-
136
-
137
-
138
-
139
-
140
-
141
-
142
-
143
-
144
-
145
-
146
-
147
-
148
-
149
-
150
-
151
-
152
-
153
-
154
-
155
-
156
-
157
-
158
-
159
-
160
 |
 |
