Epson Stylus Pro 4800 Portrait Edition Printer Guide - Page 24
Installing the Software for Macintosh
 |
View all Epson Stylus Pro 4800 Portrait Edition manuals
Add to My Manuals
Save this manual to your list of manuals |
Page 24 highlights
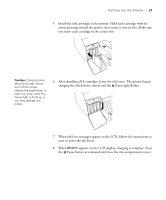
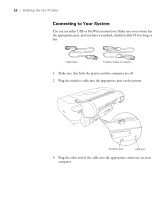
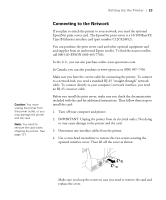
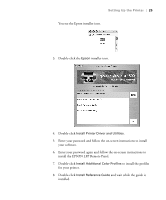
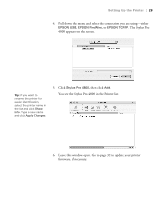
24 | Setting Up the Printer 5. Slide the card along the slots inside the compartment. Push it in firmly to fully insert the connector into the printer's internal slot. 6. Use the two screws included with the card to secure it. 7. Connect one end of the appropriate cable to the card. Then connect the other end to your computer's Ethernet port or hub. 8. Plug in the printer's power cord. Once the printer is connected to your network, you need to configure it. Turn on the printer and press the small black button on the back of the Ethernet card. Hold it down until the printer starts printing a series of status sheets. See the documentation that came with the print server for instructions on configuring it for your network. Note: You can check for a newer version of your printer driver on the Epson support site at www.support.epson.com. Installing the Software for Macintosh Follow the steps below to install the software on a Macintosh. For Windows, see page 30. 1. Turn on your Macintosh and your printer. 2. Insert the printer software CD-ROM. If necessary, double-click the Epson CD-ROM to open its window. 1-24
-
 1
1 -
2
-
3
-
4
-
5
-
6
-
7
-
8
-
9
-
10
-
11
-
12
-
13
-
14
-
15
-
16
-
17
-
18
-
 19
19 -
 20
20 -
 21
21 -
 22
22 -
 23
23 -
 24
24 -
 25
25 -
 26
26 -
 27
27 -
 28
28 -
 29
29 -
30
-
31
-
32
-
33
-
34
-
35
-
36
-
37
-
38
-
39
-
40
-
41
-
42
-
43
-
44
-
45
-
46
-
47
-
48
-
49
-
50
-
51
-
52
-
53
-
54
-
55
-
56
-
57
-
58
-
59
-
60
-
61
-
62
-
63
-
64
-
65
-
66
-
67
-
68
-
69
-
70
-
71
-
72
-
73
-
74
-
75
-
76
-
77
-
78
-
79
-
80
-
81
-
82
-
83
-
84
-
85
-
86
-
87
-
88
-
89
-
90
-
91
-
92
-
93
-
94
-
95
-
96
-
97
-
98
-
99
-
100
-
101
-
102
-
103
-
104
-
105
-
106
-
107
-
108
-
109
-
110
-
111
-
112
-
113
-
114
-
115
-
116
-
117
-
118
-
119
-
120
-
121
-
122
-
123
-
124
-
125
-
126
-
127
-
128
-
129
-
130
-
131
-
132
-
133
-
134
-
135
-
136
-
137
-
138
-
139
-
140
-
141
-
142
-
143
-
144
-
145
-
146
-
147
-
148
-
149
-
150
-
151
-
152
-
153
-
154
-
155
-
156
-
157
-
158
-
159
-
160
 |
 |
