Epson Stylus Pro 4800 Portrait Edition Printer Guide - Page 54
Removing Paper from the Spindle, Switching Between 2-Inch and 3-Inch Roll Paper
 |
View all Epson Stylus Pro 4800 Portrait Edition manuals
Add to My Manuals
Save this manual to your list of manuals |
Page 54 highlights
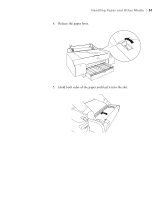
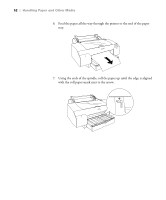
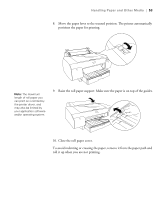
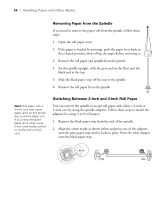
54 | Handling Paper and Other Media Removing Paper from the Spindle If you need to remove the paper roll from the spindle, follow these steps: 1. Open the roll paper cover. 2. If the paper is loaded for printing, push the paper lever back to the released position, then roll up the paper before removing it. 3. Remove the roll paper and spindle from the printer. 4. Set the spindle upright, with the gray end on the floor and the black end at the top. 5. Slide the black paper stop off the top of the spindle. 6. Remove the roll paper from the spindle. Note: Roll paper with a 2-inch core may cause paper jams on this printer due to severe paper curl. If you notice frequent paper jams when using 2-inch core media, switch to media with a 3-inch core. Switching Between 2-Inch and 3-Inch Roll Paper You can convert the spindle to accept roll paper with either a 2-inch or 3-inch core by using the spindle adapters. Follow these steps to attach the adapters for using 3-inch roll paper: 1. Remove the black paper stop from the end of the spindle. 2. Align the arrow marks as shown below and press one of the adapters onto the gray paper stop until it locks in place. Press the other adapter onto the black paper stop. 2-54
-
 1
1 -
2
-
3
-
4
-
5
-
6
-
7
-
8
-
9
-
10
-
11
-
12
-
13
-
14
-
15
-
16
-
17
-
18
-
19
-
20
-
21
-
22
-
23
-
24
-
25
-
26
-
27
-
28
-
29
-
30
-
31
-
32
-
33
-
34
-
35
-
36
-
37
-
38
-
39
-
40
-
41
-
42
-
43
-
44
-
45
-
46
-
47
-
48
-
 49
49 -
 50
50 -
 51
51 -
 52
52 -
 53
53 -
 54
54 -
 55
55 -
 56
56 -
 57
57 -
 58
58 -
 59
59 -
60
-
61
-
62
-
63
-
64
-
65
-
66
-
67
-
68
-
69
-
70
-
71
-
72
-
73
-
74
-
75
-
76
-
77
-
78
-
79
-
80
-
81
-
82
-
83
-
84
-
85
-
86
-
87
-
88
-
89
-
90
-
91
-
92
-
93
-
94
-
95
-
96
-
97
-
98
-
99
-
100
-
101
-
102
-
103
-
104
-
105
-
106
-
107
-
108
-
109
-
110
-
111
-
112
-
113
-
114
-
115
-
116
-
117
-
118
-
119
-
120
-
121
-
122
-
123
-
124
-
125
-
126
-
127
-
128
-
129
-
130
-
131
-
132
-
133
-
134
-
135
-
136
-
137
-
138
-
139
-
140
-
141
-
142
-
143
-
144
-
145
-
146
-
147
-
148
-
149
-
150
-
151
-
152
-
153
-
154
-
155
-
156
-
157
-
158
-
159
-
160
 |
 |
