Epson Stylus Pro 4800 Portrait Edition Printer Guide - Page 118
Replacing the Paper Cutter Blade, To exit the maintenance mode, turn off the printer by pressing
 |
View all Epson Stylus Pro 4800 Portrait Edition manuals
Add to My Manuals
Save this manual to your list of manuals |
Page 118 highlights
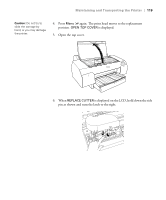
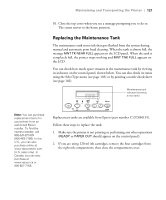
118 | Maintaining and Transporting the Printer • To change the units of measurement, press the button until you see UNIT, then press the Menu button. Press the button to switch from METER to FEET/INCH, then press Menu to select the units you want. Press the button when done. • To change the default cutting pressure, press the button until you see CUT PRESSURE, then press the Menu button to display 100%. Press the button to decrease the pressure, or the button to increase it (in 1% increments). Press Menu to select the setting you want. • To run a super strong cleaning cycle, press the button until you see SSCL, then press the Menu button to display EXEC. Press Menu to start the cleaning cycle. • To return all control panel settings to their default values, press the the button until you see DEFAULT PANEL, then press the Menu button to display EXEC. Press Menu again to restore the default settings. 3. To exit the maintenance mode, turn off the printer by pressing the P Power button. Press the P Power button again to turn on the printer in the normal operating mode. Note: You can purchase replacement blades from an authorized Epson reseller. To find the nearest reseller, call 800-GO-EPSON (800-463-7766). In the U.S., you can also purchase online at www.epsonstore.com. In Canada, you can also purchase at www.epson.ca or 800-807-7766. Replacing the Paper Cutter Blade If you notice that your paper isn't being cut cleanly, the cutter blade may need to be replaced. If you use the blade to cut heavy stock, you will damage the blade and need to replace it. See page 48 for a list of media that do not work with the cutter. You can check the status of your cutter by printing the status check sheet or viewing its status on the control panel. See page 103 for instructions. You can obtain a new cutter blade from Epson (part number C12C815291). Make sure the printer is on, then follow these steps to replace the blade: 1. Press the Menu button. 2. Press the button until you see CUTTER REPLACE. 3. Press Menu to display EXEC. 5-118
-
 1
1 -
2
-
3
-
4
-
5
-
6
-
7
-
8
-
9
-
10
-
11
-
12
-
13
-
14
-
15
-
16
-
17
-
18
-
19
-
20
-
21
-
22
-
23
-
24
-
25
-
26
-
27
-
28
-
29
-
30
-
31
-
32
-
33
-
34
-
35
-
36
-
37
-
38
-
39
-
40
-
41
-
42
-
43
-
44
-
45
-
46
-
47
-
48
-
49
-
50
-
51
-
52
-
53
-
54
-
55
-
56
-
57
-
58
-
59
-
60
-
61
-
62
-
63
-
64
-
65
-
66
-
67
-
68
-
69
-
70
-
71
-
72
-
73
-
74
-
75
-
76
-
77
-
78
-
79
-
80
-
81
-
82
-
83
-
84
-
85
-
86
-
87
-
88
-
89
-
90
-
91
-
92
-
93
-
94
-
95
-
96
-
97
-
98
-
99
-
100
-
101
-
102
-
103
-
104
-
105
-
106
-
107
-
108
-
109
-
110
-
111
-
112
-
 113
113 -
 114
114 -
 115
115 -
 116
116 -
 117
117 -
 118
118 -
 119
119 -
 120
120 -
 121
121 -
 122
122 -
 123
123 -
124
-
125
-
126
-
127
-
128
-
129
-
130
-
131
-
132
-
133
-
134
-
135
-
136
-
137
-
138
-
139
-
140
-
141
-
142
-
143
-
144
-
145
-
146
-
147
-
148
-
149
-
150
-
151
-
152
-
153
-
154
-
155
-
156
-
157
-
158
-
159
-
160
 |
 |
