Epson Stylus Pro 4800 Portrait Edition Printer Guide - Page 133
Paper Not Cut, Option I/f
 |
View all Epson Stylus Pro 4800 Portrait Edition manuals
Add to My Manuals
Save this manual to your list of manuals |
Page 133 highlights
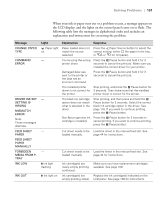
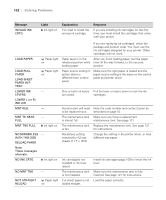
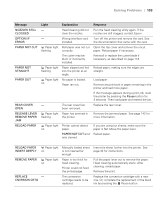
Solving Problems | 133 Message NOZZLES STILL CLOGGED OPTION I/F ERROR PAPER NOT CUT PAPER NOT STRAIGHT PAPER OUT REAR COVER OPEN RELEASE LEVER REMOVE PAPER JAM RELOAD PAPER Light - - Paper light flashing Paper light flashing Paper light on - Paper light flashing Paper light on Explanation Head cleaning did not clear the nozzles. Wrong interface card installed. Roll paper was not cut correctly. The cutter may be blunt or incorrectly installed. Paper slipped and fed into the printer at an angle. No paper is loaded. Paper ran out. The rear cover has been removed. Paper has jammed in the printer. Response Run the head cleaning utility again. If the nozzles are still clogged, contact Epson. Turn off the printer and remove the card. See the documentation that came with the card. Open the top cover and remove the uncut paper. Reload paper if necessary. Reinstall or replace the cutter blade if necessary, as described on page 118. Reload paper, making sure the edges are straight. Load paper. Remove any printouts or paper remaining in the printer and load more paper. If the message appears during a print job, reset the printer by pressing the Pause button for 3 seconds. Then load paper and resend the job. Replace the rear cover. Remove the jammed paper. See page 142 for more information. Printer cannot detect paper. If you are using cut sheets, make sure the paper is flat. Move the paper lever. PAPER NOT CUT error Reload paper. was cleared. RELOAD PAPER Paper light INSERT DEEPLY on REMOVE PAPER Paper light on REPLACE - CNVRSION CRTG Manually loaded sheet is not inserted far enough. Paper is too thick for head cleaning. Printer could not feed the printed page. The conversion cartridge needs to be replaced. Insert the sheet further into the printer. See page 44 for instructions. Pull the paper lever out to remove the paper. Head cleaning automatically starts. After cleaning, reload paper. Remove the print. Replace the conversion cartridge with a new one. Or, complete the replacement of the black ink by pressing the Pause button. 6-133
-
 1
1 -
2
-
3
-
4
-
5
-
6
-
7
-
8
-
9
-
10
-
11
-
12
-
13
-
14
-
15
-
16
-
17
-
18
-
19
-
20
-
21
-
22
-
23
-
24
-
25
-
26
-
27
-
28
-
29
-
30
-
31
-
32
-
33
-
34
-
35
-
36
-
37
-
38
-
39
-
40
-
41
-
42
-
43
-
44
-
45
-
46
-
47
-
48
-
49
-
50
-
51
-
52
-
53
-
54
-
55
-
56
-
57
-
58
-
59
-
60
-
61
-
62
-
63
-
64
-
65
-
66
-
67
-
68
-
69
-
70
-
71
-
72
-
73
-
74
-
75
-
76
-
77
-
78
-
79
-
80
-
81
-
82
-
83
-
84
-
85
-
86
-
87
-
88
-
89
-
90
-
91
-
92
-
93
-
94
-
95
-
96
-
97
-
98
-
99
-
100
-
101
-
102
-
103
-
104
-
105
-
106
-
107
-
108
-
109
-
110
-
111
-
112
-
113
-
114
-
115
-
116
-
117
-
118
-
119
-
120
-
121
-
122
-
123
-
124
-
125
-
126
-
127
-
 128
128 -
 129
129 -
 130
130 -
 131
131 -
 132
132 -
 133
133 -
 134
134 -
 135
135 -
 136
136 -
 137
137 -
 138
138 -
139
-
140
-
141
-
142
-
143
-
144
-
145
-
146
-
147
-
148
-
149
-
150
-
151
-
152
-
153
-
154
-
155
-
156
-
157
-
158
-
159
-
160
 |
 |
