Epson Stylus Pro 4800 Portrait Edition Printer Guide - Page 18
Setting Up the Printer, Unlock the print head carriage by pulling the green tab to the left.
 |
View all Epson Stylus Pro 4800 Portrait Edition manuals
Add to My Manuals
Save this manual to your list of manuals |
Page 18 highlights
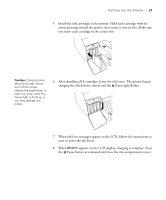
18 | Setting Up the Printer Note: To prevent paper jams, don't place the screws back in the printer. 2. Remove all the packing materials and tape. Save the box and packaging in case you need to ship the printer. 3. Remove the two screws and remove the carriage retainer bracket. Store the screws and retainer bracket in case you need to transport the printer later. 4. Unlock the print head carriage by pulling the green tab to the left. Do not push down and do not remove the tab. 1-18
-
 1
1 -
2
-
3
-
4
-
5
-
6
-
7
-
8
-
9
-
10
-
11
-
12
-
 13
13 -
 14
14 -
 15
15 -
 16
16 -
 17
17 -
 18
18 -
 19
19 -
 20
20 -
 21
21 -
 22
22 -
 23
23 -
24
-
25
-
26
-
27
-
28
-
29
-
30
-
31
-
32
-
33
-
34
-
35
-
36
-
37
-
38
-
39
-
40
-
41
-
42
-
43
-
44
-
45
-
46
-
47
-
48
-
49
-
50
-
51
-
52
-
53
-
54
-
55
-
56
-
57
-
58
-
59
-
60
-
61
-
62
-
63
-
64
-
65
-
66
-
67
-
68
-
69
-
70
-
71
-
72
-
73
-
74
-
75
-
76
-
77
-
78
-
79
-
80
-
81
-
82
-
83
-
84
-
85
-
86
-
87
-
88
-
89
-
90
-
91
-
92
-
93
-
94
-
95
-
96
-
97
-
98
-
99
-
100
-
101
-
102
-
103
-
104
-
105
-
106
-
107
-
108
-
109
-
110
-
111
-
112
-
113
-
114
-
115
-
116
-
117
-
118
-
119
-
120
-
121
-
122
-
123
-
124
-
125
-
126
-
127
-
128
-
129
-
130
-
131
-
132
-
133
-
134
-
135
-
136
-
137
-
138
-
139
-
140
-
141
-
142
-
143
-
144
-
145
-
146
-
147
-
148
-
149
-
150
-
151
-
152
-
153
-
154
-
155
-
156
-
157
-
158
-
159
-
160
 |
 |

1-18
18
|
Setting Up the Printer
2.
Remove all the packing materials and tape. Save the box and packaging
in case you need to ship the printer.
3.
Remove the two screws and remove the carriage retainer bracket. Store
the screws and retainer bracket in case you need to transport the printer
later.
4.
Unlock the print head carriage by pulling the green tab to the left. Do
not push down and do not remove the tab.
Note:
To prevent paper
jams, don’t place the
screws back in the
printer.