Epson Stylus Pro 4800 Portrait Edition Printer Guide - Page 19
Setting Up and Plugging In, Installing Ink
 |
View all Epson Stylus Pro 4800 Portrait Edition manuals
Add to My Manuals
Save this manual to your list of manuals |
Page 19 highlights
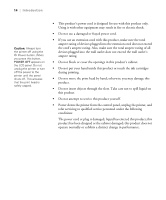
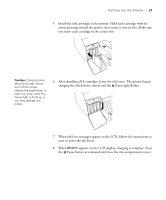
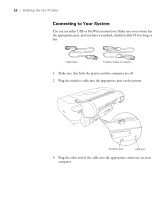
Setting Up the Printer | 19 Setting Up and Plugging In 1. Connect the power cord to the AC inlet on the back of the printer. 2. Plug the other end of the power cord into a properly grounded electrical outlet. 3. Insert the paper tray into the slots at the front of the printer. Note: The default black ink cartridge is Photo Black. If you prefer to use Matte Black (sold separately; see page 110), you can install the Matte Black cartridge immediately instead of installing the supplied Photo Black cartridge. Installing Ink Use the ink cartridges that came with your printer for initial ink charging. During the initial installation process, it is normal for up to one-third of the ink in each cartridge to be used. 1. Press the P Power button to turn on the printer. Power button 1-19
-
 1
1 -
2
-
3
-
4
-
5
-
6
-
7
-
8
-
9
-
10
-
11
-
12
-
13
-
 14
14 -
 15
15 -
 16
16 -
 17
17 -
 18
18 -
 19
19 -
 20
20 -
 21
21 -
 22
22 -
 23
23 -
 24
24 -
25
-
26
-
27
-
28
-
29
-
30
-
31
-
32
-
33
-
34
-
35
-
36
-
37
-
38
-
39
-
40
-
41
-
42
-
43
-
44
-
45
-
46
-
47
-
48
-
49
-
50
-
51
-
52
-
53
-
54
-
55
-
56
-
57
-
58
-
59
-
60
-
61
-
62
-
63
-
64
-
65
-
66
-
67
-
68
-
69
-
70
-
71
-
72
-
73
-
74
-
75
-
76
-
77
-
78
-
79
-
80
-
81
-
82
-
83
-
84
-
85
-
86
-
87
-
88
-
89
-
90
-
91
-
92
-
93
-
94
-
95
-
96
-
97
-
98
-
99
-
100
-
101
-
102
-
103
-
104
-
105
-
106
-
107
-
108
-
109
-
110
-
111
-
112
-
113
-
114
-
115
-
116
-
117
-
118
-
119
-
120
-
121
-
122
-
123
-
124
-
125
-
126
-
127
-
128
-
129
-
130
-
131
-
132
-
133
-
134
-
135
-
136
-
137
-
138
-
139
-
140
-
141
-
142
-
143
-
144
-
145
-
146
-
147
-
148
-
149
-
150
-
151
-
152
-
153
-
154
-
155
-
156
-
157
-
158
-
159
-
160
 |
 |
