Epson Stylus Pro 4800 Portrait Edition Printer Guide - Page 114
Draining the Old Ink, from the left ink compartment.
 |
View all Epson Stylus Pro 4800 Portrait Edition manuals
Add to My Manuals
Save this manual to your list of manuals |
Page 114 highlights
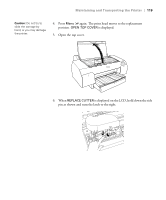
114 | Maintaining and Transporting the Printer Note: If REPLACE CNVRSION CRTG appears, press the Pause button. Remove the old conversion cartridge(s) from the left ink compartment, and then insert the new conversion cartridge(s). Go to step 4 to start again. If MNT TNK FULL appears on the LCD, you need to replace the maintenance tank. See page 121. Draining the Old Ink 1. Make sure that READY appears on the LCD panel. 2. Press the Menu button. 3. Press the button until you see MAINTENANCE, and then press the Menu button. 4. Press the button until you see BK INK CHANGE, and then press the Menu button. 5. Press the Menu button again. 6. When RAISE THE RIGHT INK LEVER appears on the LCD, raise the ink lever on the right ink compartment. 7. When RAISE THE LEFT INK LEVER appears on the LCD, raise the ink lever on the left ink compartment. 8. When REMOVE INK CRTG appears, remove all four ink cartridges from the left ink compartment. 9. When INSTALL CNVRSION CRTG appears, insert the three conversion cartridges in the slots on the left ink compartment. 10. When LOWER THE LEFT INK LEVER appears on the LCD, lower the ink lever on the left ink compartment. The printer starts draining ink and DRAINING XX% appears on the LCD. Wait until draining is complete. 5-114
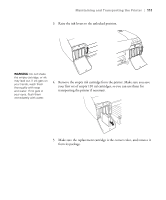
-
 1
1 -
2
-
3
-
4
-
5
-
6
-
7
-
8
-
9
-
10
-
11
-
12
-
13
-
14
-
15
-
16
-
17
-
18
-
19
-
20
-
21
-
22
-
23
-
24
-
25
-
26
-
27
-
28
-
29
-
30
-
31
-
32
-
33
-
34
-
35
-
36
-
37
-
38
-
39
-
40
-
41
-
42
-
43
-
44
-
45
-
46
-
47
-
48
-
49
-
50
-
51
-
52
-
53
-
54
-
55
-
56
-
57
-
58
-
59
-
60
-
61
-
62
-
63
-
64
-
65
-
66
-
67
-
68
-
69
-
70
-
71
-
72
-
73
-
74
-
75
-
76
-
77
-
78
-
79
-
80
-
81
-
82
-
83
-
84
-
85
-
86
-
87
-
88
-
89
-
90
-
91
-
92
-
93
-
94
-
95
-
96
-
97
-
98
-
99
-
100
-
101
-
102
-
103
-
104
-
105
-
106
-
107
-
108
-
 109
109 -
 110
110 -
 111
111 -
 112
112 -
 113
113 -
 114
114 -
 115
115 -
 116
116 -
 117
117 -
 118
118 -
 119
119 -
120
-
121
-
122
-
123
-
124
-
125
-
126
-
127
-
128
-
129
-
130
-
131
-
132
-
133
-
134
-
135
-
136
-
137
-
138
-
139
-
140
-
141
-
142
-
143
-
144
-
145
-
146
-
147
-
148
-
149
-
150
-
151
-
152
-
153
-
154
-
155
-
156
-
157
-
158
-
159
-
160
 |
 |
