Epson Stylus Pro 4800 Portrait Edition Printer Guide - Page 64
new custom size is showing., from the Settings pop-up menu. Make sure your
 |
View all Epson Stylus Pro 4800 Portrait Edition manuals
Add to My Manuals
Save this manual to your list of manuals |
Page 64 highlights
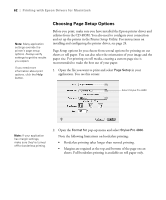
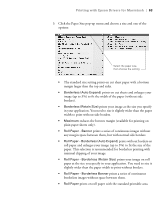
64 | Printing with Epson Drivers for Macintosh 4. Click the Paper Size pop-up menu. • If you're printing on cut-sheets, select the size of the paper loaded in the printer. Then continue with step 7. • If you're using roll paper, Epson recommends that you create a custom paper size to make the best use of your paper. Click the Settings pop-up menu (at the top of the screen) and select Custom Paper Size. You see this screen: Click New to define your custom paper size Tip: To ensure that the image is centered on the page, make the top and bottom margins the same. 5. Click New, double-click Untitled, give your paper size a name, and define its size and margins. Then click Save. (Do not click OK yet.) 6. Select Page Attributes from the Settings pop-up menu. Make sure your new custom page size is showing. 7. Choose the appropriate Orientation and Scale for printing. 8. Click OK. Then continue with the instructions in the next section to select additional settings for printing. 3-64
-
 1
1 -
2
-
3
-
4
-
5
-
6
-
7
-
8
-
9
-
10
-
11
-
12
-
13
-
14
-
15
-
16
-
17
-
18
-
19
-
20
-
21
-
22
-
23
-
24
-
25
-
26
-
27
-
28
-
29
-
30
-
31
-
32
-
33
-
34
-
35
-
36
-
37
-
38
-
39
-
40
-
41
-
42
-
43
-
44
-
45
-
46
-
47
-
48
-
49
-
50
-
51
-
52
-
53
-
54
-
55
-
56
-
57
-
58
-
 59
59 -
 60
60 -
 61
61 -
 62
62 -
 63
63 -
 64
64 -
 65
65 -
 66
66 -
 67
67 -
 68
68 -
 69
69 -
70
-
71
-
72
-
73
-
74
-
75
-
76
-
77
-
78
-
79
-
80
-
81
-
82
-
83
-
84
-
85
-
86
-
87
-
88
-
89
-
90
-
91
-
92
-
93
-
94
-
95
-
96
-
97
-
98
-
99
-
100
-
101
-
102
-
103
-
104
-
105
-
106
-
107
-
108
-
109
-
110
-
111
-
112
-
113
-
114
-
115
-
116
-
117
-
118
-
119
-
120
-
121
-
122
-
123
-
124
-
125
-
126
-
127
-
128
-
129
-
130
-
131
-
132
-
133
-
134
-
135
-
136
-
137
-
138
-
139
-
140
-
141
-
142
-
143
-
144
-
145
-
146
-
147
-
148
-
149
-
150
-
151
-
152
-
153
-
154
-
155
-
156
-
157
-
158
-
159
-
160
 |
 |
