Epson Stylus Pro 4800 Portrait Edition Printer Guide - Page 67
midtones and highlights of an image. Use this setting for, setting increases the contrast
 |
View all Epson Stylus Pro 4800 Portrait Edition manuals
Add to My Manuals
Save this manual to your list of manuals |
Page 67 highlights
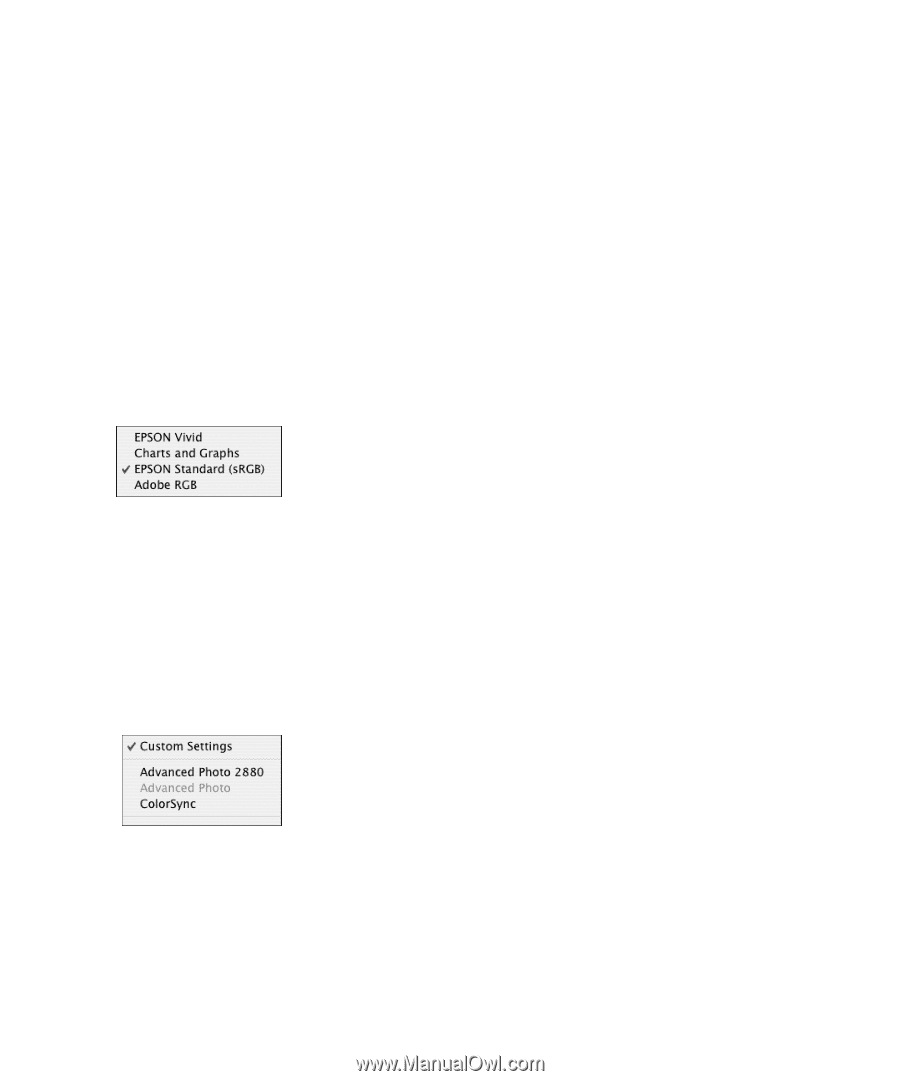
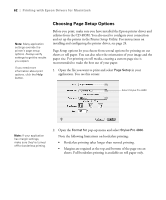
Printing with Epson Drivers for Macintosh | 67 5. For the Color setting, select Color for any type of photographic printing. Choose Advanced B&W Photo if you are printing black and white photos using this unique printer technology on select paper types. (For paper types that don't support this option, print black and white photos with the Color setting.) Select Black only if you're printing line drawings or other non-photographic images. 6. Set the Mode option as follows: • Click Automatic to have the printer driver analyze the contents of your image or file and make the appropriate printing adjustments. If a Quality/Speed slider appears in the Mode box, set it according to the priorities of your print job. You can choose one of the mode settings shown at the left: The EPSON Vivid setting produces vivid blue and green tones in printouts. Because this setting reproduces blue and green tones that cannot be displayed by your monitor, your printouts may differ from the screen images when this option is selected. The Charts and Graphs setting intensifies colors and lightens the midtones and highlights of an image. Use this setting for presentation graphics, such as charts and graphs. The EPSON Standard (sRGB) setting increases the contrast in images. Use this setting for color photographs. The Adobe RGB setting matches image colors to the Adobe RGB color standard. • Click Custom to choose one of the settings shown at the left. The two Advanced Photo settings let you print at either 1440 dpi (Advanced Photo) or 2880 dpi, the highest resolutions available. The ColorSync setting applies color management based on the printer's ICC profile, using the perceptual rendering intent. In most cases, you will get better results by applying color management in your application, rather than in the printer driver. • Click Advanced Settings to access additional options, as described below. 3-67
-
 1
1 -
2
-
3
-
4
-
5
-
6
-
7
-
8
-
9
-
10
-
11
-
12
-
13
-
14
-
15
-
16
-
17
-
18
-
19
-
20
-
21
-
22
-
23
-
24
-
25
-
26
-
27
-
28
-
29
-
30
-
31
-
32
-
33
-
34
-
35
-
36
-
37
-
38
-
39
-
40
-
41
-
42
-
43
-
44
-
45
-
46
-
47
-
48
-
49
-
50
-
51
-
52
-
53
-
54
-
55
-
56
-
57
-
58
-
59
-
60
-
61
-
 62
62 -
 63
63 -
 64
64 -
 65
65 -
 66
66 -
 67
67 -
 68
68 -
 69
69 -
 70
70 -
 71
71 -
 72
72 -
73
-
74
-
75
-
76
-
77
-
78
-
79
-
80
-
81
-
82
-
83
-
84
-
85
-
86
-
87
-
88
-
89
-
90
-
91
-
92
-
93
-
94
-
95
-
96
-
97
-
98
-
99
-
100
-
101
-
102
-
103
-
104
-
105
-
106
-
107
-
108
-
109
-
110
-
111
-
112
-
113
-
114
-
115
-
116
-
117
-
118
-
119
-
120
-
121
-
122
-
123
-
124
-
125
-
126
-
127
-
128
-
129
-
130
-
131
-
132
-
133
-
134
-
135
-
136
-
137
-
138
-
139
-
140
-
141
-
142
-
143
-
144
-
145
-
146
-
147
-
148
-
149
-
150
-
151
-
152
-
153
-
154
-
155
-
156
-
157
-
158
-
159
-
160
 |
 |