Epson Stylus Pro 4800 Portrait Edition Printer Guide - Page 87
Choose one of the following, disables automatic cutting. Choose this setting if you want
 |
View all Epson Stylus Pro 4800 Portrait Edition manuals
Add to My Manuals
Save this manual to your list of manuals |
Page 87 highlights
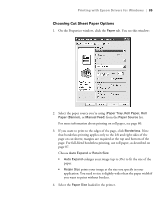
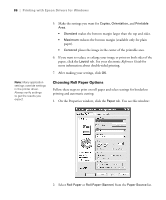
Printing with Epson Drivers for Windows | 87 Tip: Creating a user-defined paper size generally lets you make the best use of your roll paper. The Roll Paper (Banner) setting allows you to print a series of continuous images without any margin space between them. This option is not available with all applications. 3. If you want to print without margins, click Borderless. Note that borderless printing takes longer than normal printing. See page 89 for more information about borderless printing. Click Expansion. Choose Auto Expand or Retain Size, then click OK: • Auto Expand enlarges your image (up to 3%) to fit the size of the paper. You can use the slider to adjust the expansion. Choose Min for the least amount of image expansion (with a chance that there will be small borders around the edges) or Max for the greatest amount of expansion (some of the image will be cut off around the edges, but it will extend to the edge of the paper). • Retain Size prints your image at the size you specify in your application. You need to size it slightly wider than the paper width if you want to print without borders. 4. Choose one of the following Auto Cut settings: • Off disables automatic cutting. Choose this setting if you want to operate the cutter manually, print multiple print jobs without cutting, or if you are printing on heavy media that must be cut by hand. See page 55 for instructions on operating the cutter manually. • Single Cut causes the images to be printed end-to-end and saves paper. With borderless printing, you may see a sliver of the previous or next image. • Normal Cut allows margin space at the top and bottom of each image. • Double Cut extends the space between images and trims each print individually. This provides the cleanest edge for borderless printing. 5. Select the size of your image as the paper size. 4-87
-
 1
1 -
2
-
3
-
4
-
5
-
6
-
7
-
8
-
9
-
10
-
11
-
12
-
13
-
14
-
15
-
16
-
17
-
18
-
19
-
20
-
21
-
22
-
23
-
24
-
25
-
26
-
27
-
28
-
29
-
30
-
31
-
32
-
33
-
34
-
35
-
36
-
37
-
38
-
39
-
40
-
41
-
42
-
43
-
44
-
45
-
46
-
47
-
48
-
49
-
50
-
51
-
52
-
53
-
54
-
55
-
56
-
57
-
58
-
59
-
60
-
61
-
62
-
63
-
64
-
65
-
66
-
67
-
68
-
69
-
70
-
71
-
72
-
73
-
74
-
75
-
76
-
77
-
78
-
79
-
80
-
81
-
 82
82 -
 83
83 -
 84
84 -
 85
85 -
 86
86 -
 87
87 -
 88
88 -
 89
89 -
 90
90 -
 91
91 -
 92
92 -
93
-
94
-
95
-
96
-
97
-
98
-
99
-
100
-
101
-
102
-
103
-
104
-
105
-
106
-
107
-
108
-
109
-
110
-
111
-
112
-
113
-
114
-
115
-
116
-
117
-
118
-
119
-
120
-
121
-
122
-
123
-
124
-
125
-
126
-
127
-
128
-
129
-
130
-
131
-
132
-
133
-
134
-
135
-
136
-
137
-
138
-
139
-
140
-
141
-
142
-
143
-
144
-
145
-
146
-
147
-
148
-
149
-
150
-
151
-
152
-
153
-
154
-
155
-
156
-
157
-
158
-
159
-
160
 |
 |
