HP Latex 110 Users Guide - Page 115
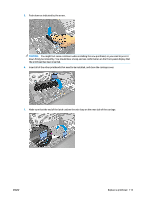
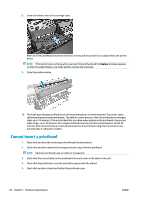
Lift up the cover. This provides access to the printheads., Replace a printhead
 |
View all HP Latex 110 manuals
Add to My Manuals
Save this manual to your list of manuals |
Page 115 highlights
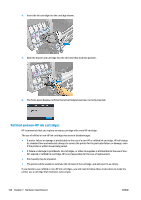
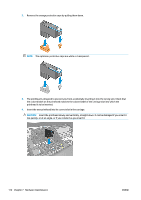
4. Locate the carriage on the right side of the printer. CAUTION: Avoid touching the printer's curing enclosure, which may be hot. 5. Pull up and release the latch on top of the carriage. 6. Lift up the cover. This provides access to the printheads. ENWW Replace a printhead 109
-
 1
1 -
2
-
3
-
4
-
5
-
6
-
7
-
8
-
9
-
10
-
11
-
12
-
13
-
14
-
15
-
16
-
17
-
18
-
19
-
20
-
21
-
22
-
23
-
24
-
25
-
26
-
27
-
28
-
29
-
30
-
31
-
32
-
33
-
34
-
35
-
36
-
37
-
38
-
39
-
40
-
41
-
42
-
43
-
44
-
45
-
46
-
47
-
48
-
49
-
50
-
51
-
52
-
53
-
54
-
55
-
56
-
57
-
58
-
59
-
60
-
61
-
62
-
63
-
64
-
65
-
66
-
67
-
68
-
69
-
70
-
71
-
72
-
73
-
74
-
75
-
76
-
77
-
78
-
79
-
80
-
81
-
82
-
83
-
84
-
85
-
86
-
87
-
88
-
89
-
90
-
91
-
92
-
93
-
94
-
95
-
96
-
97
-
98
-
99
-
100
-
101
-
102
-
103
-
104
-
105
-
106
-
107
-
108
-
109
-
 110
110 -
 111
111 -
 112
112 -
 113
113 -
 114
114 -
 115
115 -
 116
116 -
 117
117 -
 118
118 -
 119
119 -
 120
120 -
121
-
122
-
123
-
124
-
125
-
126
-
127
-
128
-
129
-
130
-
131
-
132
-
133
-
134
-
135
-
136
-
137
-
138
-
139
-
140
-
141
-
142
-
143
-
144
-
145
-
146
-
147
-
148
-
149
-
150
-
151
-
152
-
153
-
154
-
155
-
156
-
157
-
158
-
159
-
160
 |
 |
4.
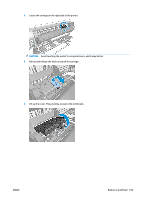
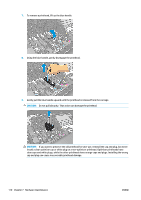
Locate the carriage on the right side of the printer.
CAUTION:
Avoid touching the printer's curing enclosure, which may be hot.
5.
Pull up and release the latch on top of the carriage.
6.
Lift up the cover. This provides access to the printheads.
ENWW
Replace a printhead
109