HP Latex 110 Users Guide - Page 143
Front-panel error codes
 |
View all HP Latex 110 manuals
Add to My Manuals
Save this manual to your list of manuals |
Page 143 highlights
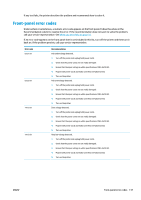
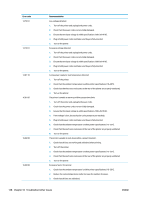
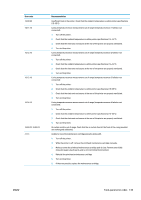
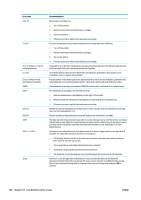
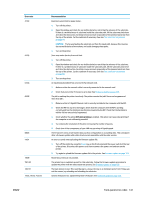
If any test fails, the printer describes the problem and recommends how to solve it. Front-panel error codes Under certain circumstances, a numeric error code appears on the front panel. Follow the advice in the Recommendation column to resolve the error. If the recommendation does not seem to solve the problem, call your service representative. See When you need help on page 34. If an error code appears on the front panel that is not included in this list, turn off the printer and then turn it back on. If the problem persists, call your service representative. Error code 03.21:01 03.22:01 14.72:01 14.73:01 Recommendation PSU undervoltage detected. 1. Turn off the printer and unplug both power cords. 2. Check that the power cords are not visibly damaged. 3. Ensure that the input voltage is within specifications (180-264 V AC). 4. Plug in both power cords and make sure they are fully inserted. 5. Turn on the printer. PSU overvoltage detected. 1. Turn off the printer and unplug both power cords. 2. Check that the power cords are not visibly damaged. 3. Ensure that the input voltage is within specifications (180-264 V AC). 4. Plug in both power cords and make sure they are fully inserted. 5. Turn on the printer. Zero voltage detected. 1. Turn off the printer and unplug both power cords. 2. Check that the power cords are not visibly damaged. 3. Ensure that the input voltage is within specifications (180-264 V AC). 4. Plug in both power cords and make sure they are fully inserted. 5. Turn on the printer. Very low voltage detected. 1. Turn off the printer and unplug both power cords. 2. Check that the power cords are not visibly damaged. 3. Ensure that the input voltage is within specifications (180-264 V AC). 4. Plug in both power cords and make sure they are fully inserted. 5. Turn on the printer. ENWW Front-panel error codes 137
-
 1
1 -
2
-
3
-
4
-
5
-
6
-
7
-
8
-
9
-
10
-
11
-
12
-
13
-
14
-
15
-
16
-
17
-
18
-
19
-
20
-
21
-
22
-
23
-
24
-
25
-
26
-
27
-
28
-
29
-
30
-
31
-
32
-
33
-
34
-
35
-
36
-
37
-
38
-
39
-
40
-
41
-
42
-
43
-
44
-
45
-
46
-
47
-
48
-
49
-
50
-
51
-
52
-
53
-
54
-
55
-
56
-
57
-
58
-
59
-
60
-
61
-
62
-
63
-
64
-
65
-
66
-
67
-
68
-
69
-
70
-
71
-
72
-
73
-
74
-
75
-
76
-
77
-
78
-
79
-
80
-
81
-
82
-
83
-
84
-
85
-
86
-
87
-
88
-
89
-
90
-
91
-
92
-
93
-
94
-
95
-
96
-
97
-
98
-
99
-
100
-
101
-
102
-
103
-
104
-
105
-
106
-
107
-
108
-
109
-
110
-
111
-
112
-
113
-
114
-
115
-
116
-
117
-
118
-
119
-
120
-
121
-
122
-
123
-
124
-
125
-
126
-
127
-
128
-
129
-
130
-
131
-
132
-
133
-
134
-
135
-
136
-
137
-
 138
138 -
 139
139 -
 140
140 -
 141
141 -
 142
142 -
 143
143 -
 144
144 -
 145
145 -
 146
146 -
 147
147 -
 148
148 -
149
-
150
-
151
-
152
-
153
-
154
-
155
-
156
-
157
-
158
-
159
-
160
 |
 |