HP Latex 110 Users Guide - Page 91
The printhead status plot, 2. The optimizer check plot, Image-quality maintenance, Clean
 |
View all HP Latex 110 manuals
Add to My Manuals
Save this manual to your list of manuals |
Page 91 highlights
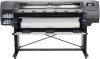
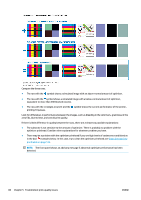
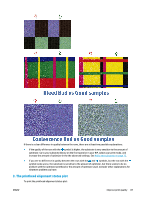
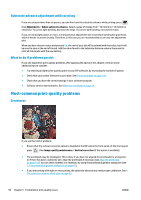
1. The printhead status plot The printhead status plot consists of patterns that are designed to highlight printhead reliability problems. It helps to determine whether any printhead is experiencing clogging or other problems. To print this plot, go to the front panel and press , then Image-quality maintenance > Clean printheads > Print test plot. Vinyl, preferably gloss at least 36 inches wide, is recommended for maximum visibility. Other substrate types may not show enough detail to see the optimizer dashes clearly. The plot consists of small dashes, one for each nozzle on each printhead. For each individual colored pattern, make sure that most of the dashes are present. Corrective action 1. Clean any faulty printheads. See Clean (recover) the printheads on page 105. Then reprint the printhead status plot to see whether the problem has been solved. 2. If the problem persists, clean the printheads again, and reprint the printhead status plot to see whether the problem has been solved. 3. If the problem continues to persist, replace any persistently faulty printheads. See Replace a printhead on page 108. 2. The optimizer check plot To print the optimizer check plot: 1. Use the same substrate type that you were using when you detected a problem. 2. Check that the selected substrate type is the same as the substrate type that is loaded into the printer. 3. Go to the front panel and press , then Image-quality maintenance > Print latex optimizer test plot. The latex optimizer is a transparent fluid that may not be visible on all substrates; vinyl is recommended for maximum visibility. This print consists of several area fills, text, lines and color bars. It is intended to identify print-quality problems that may be caused by optimizer nozzle defects. ENWW Improve print quality 85
-
 1
1 -
2
-
3
-
4
-
5
-
6
-
7
-
8
-
9
-
10
-
11
-
12
-
13
-
14
-
15
-
16
-
17
-
18
-
19
-
20
-
21
-
22
-
23
-
24
-
25
-
26
-
27
-
28
-
29
-
30
-
31
-
32
-
33
-
34
-
35
-
36
-
37
-
38
-
39
-
40
-
41
-
42
-
43
-
44
-
45
-
46
-
47
-
48
-
49
-
50
-
51
-
52
-
53
-
54
-
55
-
56
-
57
-
58
-
59
-
60
-
61
-
62
-
63
-
64
-
65
-
66
-
67
-
68
-
69
-
70
-
71
-
72
-
73
-
74
-
75
-
76
-
77
-
78
-
79
-
80
-
81
-
82
-
83
-
84
-
85
-
 86
86 -
 87
87 -
 88
88 -
 89
89 -
 90
90 -
 91
91 -
 92
92 -
 93
93 -
 94
94 -
 95
95 -
 96
96 -
97
-
98
-
99
-
100
-
101
-
102
-
103
-
104
-
105
-
106
-
107
-
108
-
109
-
110
-
111
-
112
-
113
-
114
-
115
-
116
-
117
-
118
-
119
-
120
-
121
-
122
-
123
-
124
-
125
-
126
-
127
-
128
-
129
-
130
-
131
-
132
-
133
-
134
-
135
-
136
-
137
-
138
-
139
-
140
-
141
-
142
-
143
-
144
-
145
-
146
-
147
-
148
-
149
-
150
-
151
-
152
-
153
-
154
-
155
-
156
-
157
-
158
-
159
-
160
 |
 |