HP Latex 110 Users Guide - Page 90
General printing advice, Improve print quality
 |
View all HP Latex 110 manuals
Add to My Manuals
Save this manual to your list of manuals |
Page 90 highlights
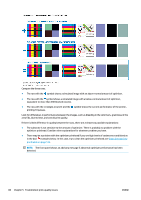
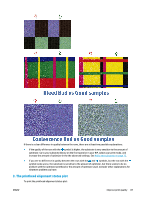
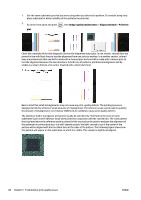
General printing advice Use the following approach when you have any print-quality problem: ● Make sure that the substrate type that you select on the front panel, and in your RIP software, is the same as the substrate type that is loaded in the printer. Make sure that the substrate type has been calibrated (including substrate-advance, printhead, and color calibration). CAUTION: If you have the wrong substrate type selected, you could experience poor print quality and incorrect colors, and perhaps even damage to the printheads. ● Make sure that you are using the correct substrate preset for your substrate, with the correct ICC profile, or that you have followed the correct procedure to generate a new substrate preset (see Add a new substrate on page 75). ● Make sure that you are using appropriate print-quality settings in your RIP software. ● Make sure that your environmental conditions (temperature, humidity) are in the recommended range. See Environmental specifications on page 145. ● Make sure that your ink cartridges have not passed their expiration dates. See Maintain the ink cartridges on page 101. ● Avoid touching the substrate while printing is in progress. ● Trying to print jobs with a lot of ink in fast modes (commonly 6 passes or below) may result in not- completely-dry output and/or other print-quality problems. Consider using modes with higher passes when printing with a lot of ink, or increase the curing temperature. Note that increasing the curing temperature may deform your substrate (see The substrate is deformed or wrinkled on page 67). Improve print quality As a first step, you may be able to improve print quality with a single command. At the front panel, press , then Image-quality maintenance > Optimize print quality. This performs printhead recovery, alignment, and color calibration routines, in order to optimize your print quality automatically in a single step. Allow up to 30 minutes for the printer to perform the whole process. If you still experience print-quality problems, you can follow a more hands-on print-quality troubleshooting procedure, by printing, interpreting, and performing corrective actions. You can print all the test plots at once for complete debugging of your print-quality problem. At the front panel, press , then Image-quality maintenance > Print all test plots. Alternatively, you can print the test plots individually for specific debugging of nozzle health, alignment, optimizer, or substrate-advance print-quality issues as described below. 84 Chapter 5 Troubleshoot print-quality issues ENWW
-
 1
1 -
2
-
3
-
4
-
5
-
6
-
7
-
8
-
9
-
10
-
11
-
12
-
13
-
14
-
15
-
16
-
17
-
18
-
19
-
20
-
21
-
22
-
23
-
24
-
25
-
26
-
27
-
28
-
29
-
30
-
31
-
32
-
33
-
34
-
35
-
36
-
37
-
38
-
39
-
40
-
41
-
42
-
43
-
44
-
45
-
46
-
47
-
48
-
49
-
50
-
51
-
52
-
53
-
54
-
55
-
56
-
57
-
58
-
59
-
60
-
61
-
62
-
63
-
64
-
65
-
66
-
67
-
68
-
69
-
70
-
71
-
72
-
73
-
74
-
75
-
76
-
77
-
78
-
79
-
80
-
81
-
82
-
83
-
84
-
 85
85 -
 86
86 -
 87
87 -
 88
88 -
 89
89 -
 90
90 -
 91
91 -
 92
92 -
 93
93 -
 94
94 -
 95
95 -
96
-
97
-
98
-
99
-
100
-
101
-
102
-
103
-
104
-
105
-
106
-
107
-
108
-
109
-
110
-
111
-
112
-
113
-
114
-
115
-
116
-
117
-
118
-
119
-
120
-
121
-
122
-
123
-
124
-
125
-
126
-
127
-
128
-
129
-
130
-
131
-
132
-
133
-
134
-
135
-
136
-
137
-
138
-
139
-
140
-
141
-
142
-
143
-
144
-
145
-
146
-
147
-
148
-
149
-
150
-
151
-
152
-
153
-
154
-
155
-
156
-
157
-
158
-
159
-
160
 |
 |