HP Latex 110 Users Guide - Page 128
Cannot insert the maintenance cartridge, Clean and lubricate the carriage rod
 |
View all HP Latex 110 manuals
Add to My Manuals
Save this manual to your list of manuals |
Page 128 highlights
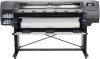
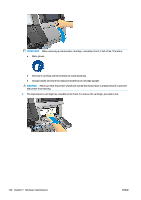
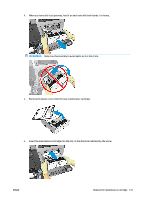
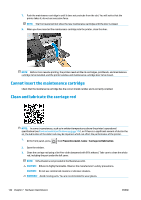
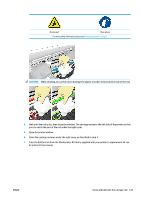
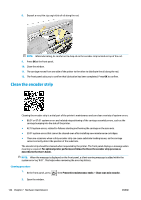
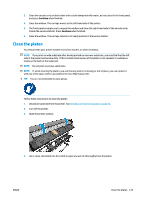
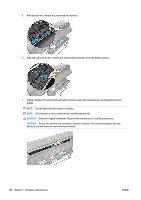
7. Push the maintenance cartridge in until it does not protrude from the slot. You will notice that the printer takes it; do not use excessive force. NOTE: The front panel will not show the new maintenance cartridge until the door is closed. 8. When you have inserted the maintenance cartridge into the printer, close the door. NOTE: Before it can resume printing, the printer needs all the ink cartridges, printheads, and maintenance cartridge to be installed, and the printer window and maintenance cartridge door to be closed. Cannot insert the maintenance cartridge Check that the maintenance cartridge has the correct model number and is correctly oriented. Clean and lubricate the carriage rod NOTE: In some circumstances, such as in ambient temperatures above the printer's operational specification (see Environmental specifications on page 145), or if there is a significant amount of dust in the air, the lubrication of the slider rods may be impaired, which can affect the performance of the printer. 1. At the front panel, press , then Preventive maint. tasks > Carriage rod lubrication. 2. Open the window. 3. Clean the carriage rod using a lint-free cloth dampened with 95% ethanol. Take care to clean the whole rod, including the part under the left cover. NOTE: 95% ethanol is not provided in the Maintenance Kit. CAUTION: Ethanol is highly flammable. Observe the manufacturer's safety precautions. CAUTION: Do not use commercial cleaners or abrasive cleaners. WARNING! Avoid moving parts. You are recommended to wear gloves. 122 Chapter 7 Hardware maintenance ENWW
-
 1
1 -
2
-
3
-
4
-
5
-
6
-
7
-
8
-
9
-
10
-
11
-
12
-
13
-
14
-
15
-
16
-
17
-
18
-
19
-
20
-
21
-
22
-
23
-
24
-
25
-
26
-
27
-
28
-
29
-
30
-
31
-
32
-
33
-
34
-
35
-
36
-
37
-
38
-
39
-
40
-
41
-
42
-
43
-
44
-
45
-
46
-
47
-
48
-
49
-
50
-
51
-
52
-
53
-
54
-
55
-
56
-
57
-
58
-
59
-
60
-
61
-
62
-
63
-
64
-
65
-
66
-
67
-
68
-
69
-
70
-
71
-
72
-
73
-
74
-
75
-
76
-
77
-
78
-
79
-
80
-
81
-
82
-
83
-
84
-
85
-
86
-
87
-
88
-
89
-
90
-
91
-
92
-
93
-
94
-
95
-
96
-
97
-
98
-
99
-
100
-
101
-
102
-
103
-
104
-
105
-
106
-
107
-
108
-
109
-
110
-
111
-
112
-
113
-
114
-
115
-
116
-
117
-
118
-
119
-
120
-
121
-
122
-
 123
123 -
 124
124 -
 125
125 -
 126
126 -
 127
127 -
 128
128 -
 129
129 -
 130
130 -
 131
131 -
 132
132 -
 133
133 -
134
-
135
-
136
-
137
-
138
-
139
-
140
-
141
-
142
-
143
-
144
-
145
-
146
-
147
-
148
-
149
-
150
-
151
-
152
-
153
-
154
-
155
-
156
-
157
-
158
-
159
-
160
 |
 |